Category Archives: Mac

Mac Lock Screen Keyboard Shortcut(s)

The following is a method for creating a keyboard shortcut on a Mac such that the shortcut will lock the screen. This method involves using the Mac’s Automator and a bit of shell script. It is also important to set certain settings. We are going to show two different shortcut options. They can be run in parallel if desired. They also may be modified within reason and remain equally effective.

Launch Automator

  • From Automator choose File –> New –> Service which will open a new automation dialog
  • Here you have two (inclusive) options:
    • From the automation dialog select Utilities from the left-hand pane and then Run Shell Script
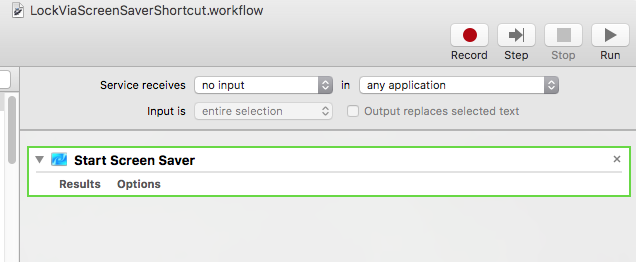
    • From the automation dialog select Utilities from the left-hand pane and then Start Screen Saver (pictured)
Utilities: Run or Start
  • What’s the difference?
    • The shell script puts the system directly into the suspended state.
    • Suspending the system (via script) is slower but requires no additional settings.
    • Launching the screen saver does just that.
    • Launching the screen saver requires certain screen saver settings (below) and is faster.

The Automation (Two Options)

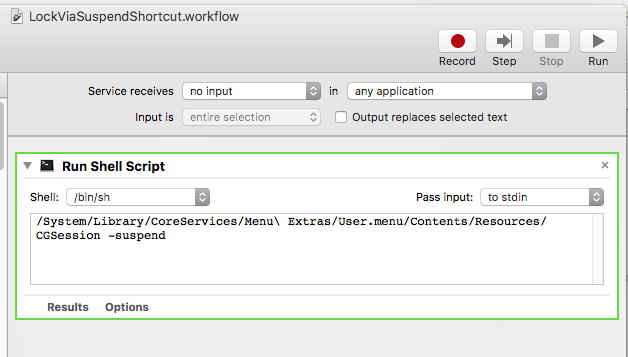
  • This is the line of code for you to copy and paste as below: /System/Library/CoreServices/Menu\ Extras/User.menu/Contents/Resources/CGSession -suspend
  • Again you will follow either the Run Shell Script path or the Start Screen Saver path:
    • Note the “no input” and the “any application” settings in both drop-downs for both methods below.

Via Shell Script (using Suspend):

  • Call the Run Shell Script something clear: LockViaSuspendShortcut
  • This is the line of code for you to copy and paste as above: /System/Library/CoreServices/Menu\ Extras/User.menu/Contents/Resources/CGSession -suspend
    • You will see the argument -switchToUserID for CGSession as well. This does not lock the screen. Do not use it.)
  • The Shell Script method (using suspend):
Lock via Script
Lock via Script

Via the Screen Saver:

  • … or Call the Start the Screen Saver something clear: LockViaScreenSaver
  • The Start the Screen Saver method:
Lock via Screen Saver

Note:

  • If you need to delete an Automator Workflow, you can locate them in ~/Library/Services/
  • It may be possible to make an automation available to all users (untested) by placing it in /Library/Application Support/Apple/Automator/

Set Up the Keyboard Shortcut(s)

  • Once you have created these automations, you will only need to assign a shortcut for each.
  • Navigate to System Preferences –> Keyboard –> Shortcuts –> Services
  • Since you have used clear names per the above, you will have no difficulty identifying which automation is which.
Shortcuts
Shortcuts
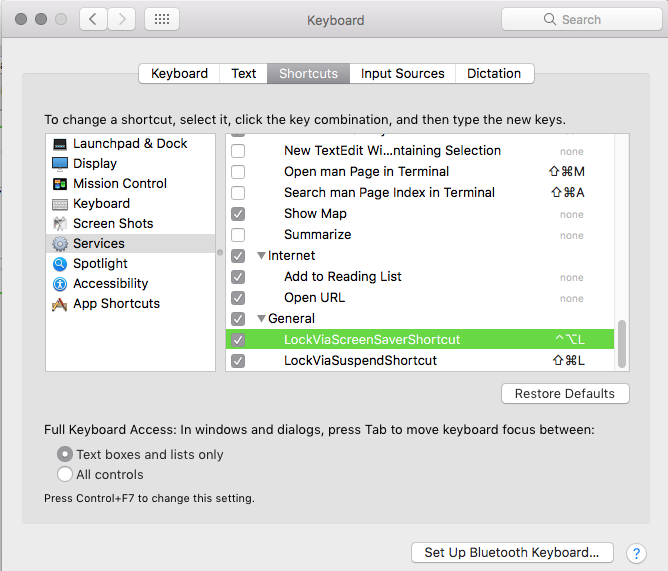
  • The field to the right of the name of the automation holds the key combination.
  • Choose what you’d like and choose wisely.
    • LockViaScreenSaverShortcut is set as ctrl-alt-L
    • LockViaSuspendShortcut is set as shift-super-L
  • The mouse may need to be out of a VM in order for the shortcuts to be captured by the Mac.

Additional Screen Saver Settings

  • Open System Preferences –> Desktop & Screen Saver –> Screen Saver
  • Set “Start after:” as “5 Minutes
  • Open System Preferences –> Security & Privacy –> General
  • Set “Require password” as “5 seconds
    • These fives seconds will give you a small buffer to keep your screen from locking if you are reading an article and it goes blank.
Share

The New Disk Utility in El Capitan

Two steps forward, one step back.  Often in computing it’s a way of life.

There are a lot of new features in El Capitan and its related hardware.  If you want to learn about them you can find hordes of information in them Interwebz.  But if you are thinking something might be amiss, you’ll have difficulty slogging through the praises to locate the deficiencies.

Don’t get me wrong, I love Apple and Macs.  Well, I dislike them only as much as I dislike all computers and operating systems.  Same thing.  It’s just that Mac fans, greater than any other group of technology adherents, have the awesomest rose-colored glasses.

If you gander at this article on the latest version of Disk Utility, you will find much praise.

It made sense that repairing permissions on files for which OS X knew precisely what settings should be in place could fix random faults…. Even so, from all reports, permissions repairs had little real effect for years—it just made us feel better.

So here at work we support more than 200 Macs.  I can assure you that at least some of the time Repair Permissions does actually fix permissions and thus fix issues facing real users.  Yes, that gives me all the feels; but it does that by actually fixing problems.  It is not praiseworthy to remove such functionality.

Have the new security measures introduced in El Capitan removed the need for future permissions repairs?  This remains to be seen.  Nonetheless, it was doing good work.  Whether that work is now unnecessary is yet an open question.

What about Disk Repair?

Select a drive or a partition and click First Aid, and a seemingly much-changed repair operation proceeds.

It doesn’t just seem different.  It works differently and in at least one scenario fails utterly to repair the disk (presumably the partition table).

I used dd to copy a drive from an ssd to a thumb-drive of smaller capacity.  After dd finished it’s copy operation I checked the drive in GParted which reported no partitions.  This was likely due to the partition table including a partition-end beyond the end of the drive.  This is expected.  Just need to repair the partition table.  The drive booted as expected; all the data was good.

I attached that drive to an El Capitan machine and discovered the new Disk Utility.  Being that all the usual repair options were missing I ran First Aid.  That completed successfully.  Nothing was changed: GParted still reported no partitions.

I then attached the drive to a Yosemite machine and ran the old Disk Repair.  This also completed successfully.  The difference of course is that when I checked again using GParted the partitions were listed correctly.

In short, the Disk Utility on Yosemite was able to make the necessary repairs while the new Disk Utility on El Capitan was not.

I don’t know that the new Disk Utility will be of any use to IT professionals.  I recommend you keep a bootable Yosemite around in case you have need for these useful tools.

Share

Mac Disk Utility Image Issues

If you run into difficulties, for no apparent reason, while attempting to restore a drive from an image using Disk Utility, you may be able to get around this by using this method of selecting the source and destination.

I can’t say why this works, but normally I would simply drag-and-drop my source and destination into their respective fields.  However, if the imaging fails you can try selecting each by right-clicking on that item (in the left pane) and choosing either “Set as source” or “Set as destination” from the menu which appears.

(If you do not enable right-click, ctrl-click will produce the same menu.)

So far this has worked in every instance where the image should function but was not working using the other methods of selecting the source and destination.  As they say, your mileage may vary.

Go get ’em.

Share

Delete Keychain Folder

We run the Casper Suite to control our Macs at work, and we are using folder re-direction for our conference room machines (for the users’ home directories).  Since all of these machines are Active Directory members and users do change their passwords (quite frequently per policy), we have issues when folks attempt to log into a conference room machine after they have changed their passwords.

The real trouble seems to be that Apple hasn’t quite readied the Mac OS for full enterprise AD integration.  Though the Macs are members and though a user is able to log in using network credentials, once those credentials are cached the OS doesn’t like to check with AD when the credentials offered by the user are not matched with those cached in the keychain.

I created a Self Service script which simply removes the entire keychain folder for the then logged-in user.  If there is a less heavy-handed solution to this matter I have not yet found it.  Here is that script for entertainment.

##
## Conference Room Keychain Fix
#!/bin/bash


## Delete user's Keychains folder (located in redirected home directory's Library folder)

username=$(stat -f %Su /dev/console)
rm -R /home/"$username"/Library/Keychains/


exit
##

I hope you find this useful and expedient.

Share

Fix for Firefox’s Profile Manager Error

There is a bug in Firefox (as near as I can tell) and it has been present for many versions (more than a dozen at least). It only effects users in a particular configuration on Macs, so it is not very likely to get any love any time soon. (I filed a bug report here ages ago.)

In short, Firefox is able to create it’s Profiles folder under /path/to/home/[username]/Library/Application Support/Firefox/ and it is able to create the associated profiles.ini file next to it.  However, Firefox is not able to add the information pointing the profiles.ini folder at the newly created profile folder.

If you try to launch Firefox you will only get the Profile Manager and it will not be able to see any profiles, nor will it be able to create one.  Instead it throws an error:

Profile Manager Error

Anyway, perhaps one day Mozilla will fix it.  In the meantime I need to be able to fix this for users.  I know I can add a known-good profile and profiles.ini pair, so I figured I could just build my own profiles.ini file based on what I saw in the Profiles folder.  That worked so I just needed to create a way to use that information.

We use the Casper Suite to manage the Macs in our environment, so I was bent on doing something through Casper.  Additionally I wanted to user Casper’s Self Service application so I could just point a user to a single button to fix the problem.

Here is the script I added for users to evoke through Self Service.

## 
#! /usr/bin/env bash 
# Fix Firefox profile manager error on machines with re-directed home directories. 
# by JamesIsIn 
# Do something nice today. 
# https://github.com/jamesisin/slop-bucket/blob/master/popit/ConfRm_Replace_Firefox_profiles_ini.sh
## 


#Get current logged-in username. 
username=$( stat -f %Su /dev/console ) 


# Get first profile name in user's Library folder. 
profile="$( basename /home/"${username}"/Library/Application\ Support/Firefox/Profiles/* | head -1 )" 


# Empty and populate user's Firefox profiles file. 
printf "[General]\nStartWithLastProfile=1\n\n[Profile0]\nName=Default User\nIsRelative=1\n" 1>/home/"${username}"/Library/Application\ Support/Firefox/profiles.ini 
printf "Path=Profiles/""${profile}" 1>>/home/"${username}"/Library/Application\ Support/Firefox/profiles.ini 


exit 0 
## 

First I get the username of whomever happens to be logged in at the time Self Service is run on that machine and save that in a variable (called username).

Then I get the name of the first profile located in the user’s Firefox folder (under the user’s Library folder).  It doesn’t matter which one I use, I just arbitrarily chose the first one.  This way if there is only one I’ll be ok too.  I store that in a separate variable (called profile).

Finally I use those two variables to construct the appropriate profiles.ini file (using printf and standard output redirection).

Hope that helps you.

Share

Update JoinMe as a Normal User

Sometimes it may be faster to launch and update JoinMe as the currently-logged-in user rather than logging out as that user and logging back in as an administrator.  In those cases you can follow these instructions to launch and update JoinMe as a privileged user without logging out as the current user.

  • Open a Terminal
  • Switch user to root (su root); you may have to su to administrator first
  • Launch JoinMe: /Applications/join.me.app/Contents/MacOS/join.me
  • JoinMe will launch and update successfully, then you should close JoinMe
  • Now you may launch JoinMe from the Dock as the user
  • Remember to exit out of your changed user session in the Terminal (and close the Terminal if appropriate)

(This is important only only on a Mac.  Windows doesn’t require elevation to run this update.)

That’s it.

Share

Mac Gets Spaced out of Bounds

You may have heard some of the cool kids discussing Spaces and wondered “what’s that all about?”.  Or not.  Many Mac users don’t even know about this feature.  I came from years of using Linux systems where having multiple desktops was the norm.  Before Apple introduced Spaces I was using a third-party application to provide that feature-set.  (I have done the same thing on Windows as well.  You can read about that here.  Ubuntu, of course, still has it natively.)

Recently I encountered an oddity with Spaces which deserves a mention.

Normally with Spaces enabled you can simply Super-<up arrow> (command-<up arrow> or Apple-<up-arrow> or Windows-<up arrow>) to get to the Spaces control area (also known as Mission Control).  That was working fine.  However, once in this control area one ought to see a + in the upper-right corner by which one can spawn an additional space into Spaces.

I knew it had been there at one time, but at some point I noticed it was missing.  Not a big deal.  I could still create new spaces for full-screen applications; I just couldn’t create an empty desktop.  A minor annoyance.

In researching a mildly unrelated item I was reading this thread.  One user mentioned the bug whereby if your Dock is docked to the right-hand side of your screen (mine is) the + is MIA (mine was).  The the kicker reply came informing that commenter that with the Dock on the right the + was on the left.

It’s not exactly true.  You have to mouse over to the upper-left corner and the space and + fly-out from the left edge.

So that little mystery is solved.

Share

Get Information from Mac’s System Profiler

I had need recently to get both the serial numbers and the processor information from all of the Macs on our domain here at work.  I had zero interest in visiting every desk to do this so I did some kicking around and found a fine command line tool where I could what I needed with a couple simple lines of code.

The utility, called System Profiler, has a command line element which is evoked by the command system_profiler.  I’ll show you a couple of examples (which I used to get the serial numbers and processor information).

First, to get the serial number for a machine I ssh’d to that machine (ssh root@machine-name) and ran this:

system_profiler | grep “r (system)”

(You will need to replace the fancy quotes above with regular un-fancy quotes if you use this at your terminal.)

And to get the processor information I ran this equally simple line of code:

system_profiler | grep Proc

Feel free to check the output on your own Mac.

You can also just run system_profiler, but you get a lot of output from that.

system_profiler

If you have some inkling of what you seek you could try something using grep (as I did above).  Note that you can find the exact string in my greps above in their respective outputs.  Play around with grep; it’s pretty harmless on its own.

Hope it helps you in your adventures.

Share

Download the Proper 64 Bit Opera for Windows

As you probably have guessed, Opera is my preferred browser across all operating systems.  I know they have a 64 bit version for Windows (as they do for Mac and Linux), but for whatever reason that particular version is tricky to locate.

Normally you can just hit their site and you will be directed to download the correct version for your system.  Unfortunately the 32 bit version for Windows is what is presented.

If you would like to get the Windows 64 bit version (or any number of other different or older versions), try starting with this page.  Once on that page you can follow a selection tree to get to the version you are after.  For the Windows version you would first click Windows, then click the latest version number, and finally choose 64 bit from the “Architecture” drop-down menu and click the “Free Download for Windows” button.

That’s it.  You can thank me later.

Share