Category Archives: OS

Operating Systems

A Couple Recent Conversions for Audio and Video

I’ve had to make a couple of unusual conversion of late and wanted to make note of the solutions for my future self.  Hey, future self, git with it!

First, converting dsf (and I think also dff) files into flac files I just used ffmpeg as follows:

## 
# first cd into the directory containing the dsf files in question, then… 
ffmpeg -i 15-Penny\ Lane.dsf 15-Penny\ Lane.flac 
##

Then I also needed to convert an ISO into some constituent mkv files. For this I used makemkv.

## 
# first you'll need to install it from the Snap repositories.  
snap install makemkv 
# then open the graphical application and point it at your ISO.
##

Both pretty handy, easy, and fool-proof. I’m the fool. I’m the proof. Good hunting.

Share

Powershellish Mailbox Creation

Found these old notes for making a post.  Figured I may as well move the notes here even if they are less relevant.  Maybe it will be useful to someone.

Mailbox Creation

Sometimes those old Exchange gui’s just ain’t enough. Time to bust out the command line. Here is some very useful information about doing just that.
So, of course, there is a special command prompt you will want to use: the Exchange Management Shell.

Main Data

I pulled this directly from the MS helps pages in Exchange. I did, however, add the very important (and neglected) identifier for each of these five mailbox types (at least my best guess):

User Account:

##
New-Mailbox -Name -Database -OrganizationalUnit -Password -UserPrincipalName [-ActiveSyncMailboxPolicy ] [-Alias ] [-DisplayName ] [-DomainController ] [-FirstName ] [-Initials ] [-LastName ] [-ManagedFolderMailboxPolicy ] [-ManagedFolderMailboxPolicyAllowed ] [-ResetPasswordOnNextLogon <$true | $false>] [-SamAccountName ] [-TemplateInstance ]
##

Linked Account:

##
New-Mailbox -Name -Database -LinkedDomainController -LinkedMasterAccount -OrganizationalUnit -UserPrincipalName [-ActiveSyncMailboxPolicy ] [-Alias ] [-DisplayName ] [-DomainController ] [-FirstName ] [-Initials ] [-LastName ] [-LinkedCredential ] [-ManagedFolderMailboxPolicy ] [-ManagedFolderMailboxPolicyAllowed ] [-Password ] [-ResetPasswordOnNextLogon <$true | $false>] [-SamAccountName ] [-TemplateInstance ]
##

Room Account:

##
New-Mailbox -Name -Database -OrganizationalUnit -Room -UserPrincipalName [-ActiveSyncMailboxPolicy ] [-Alias ] [-DisplayName ] [-DomainController ] [-FirstName ] [-Initials ] [-LastName ] [-ManagedFolderMailboxPolicy ] [-ManagedFolderMailboxPolicyAllowed ] [-Password ] [-ResetPasswordOnNextLogon <$true | $false>] [-SamAccountName ] [-TemplateInstance ]
##

Equipment Account:

##
New-Mailbox -Name -Database -Equipment -OrganizationalUnit -UserPrincipalName [-ActiveSyncMailboxPolicy ] [-Alias ] [-DisplayName ] [-DomainController ] [-FirstName ] [-Initials ] [-LastName ] [-ManagedFolderMailboxPolicy ] [-ManagedFolderMailboxPolicyAllowed ] [-Password ] [-ResetPasswordOnNextLogon <$true | $false>] [-SamAccountName ] [-TemplateInstance ]
##

Shared Account:

##
New-Mailbox -Name -Database -OrganizationalUnit -Shared -UserPrincipalName [-ActiveSyncMailboxPolicy ] [-Alias ] [-DisplayName ] [-DomainController ] [-FirstName ] [-Initials ] [-LastName ] [-ManagedFolderMailboxPolicy ] [-ManagedFolderMailboxPolicyAllowed ] [-Password ] [-ResetPasswordOnNextLogon <$true | $false>] [-SamAccountName ] [-TemplateInstance ]
##

Examples in Action

Create a shared mailbox:

##
new-Mailbox -alias testsharedmbx -name TestSharedMailbox -database "Mailbox Database" -org Users -shared -UserPrincipalName testsharedmbx@example.com
##

Realworld example:

##
new-Mailbox -alias sanfrancisco -name SanFrancisco -database "Mailbox Database" -org "simplecompany.lan/simpleCOMPANY/Resource Accounts" -shared -UserPrincipalName sanfrancisco@simplecompany.lan
##

Notes:

  • alias is the whatever@
  • name relates to the display name

Adding Permissions

Main Data

##
Add-MailboxPermission
Add-MailboxPermission -Identity "Some User" -User DonaldK -Accessright Fullaccess -InheritanceType all
##

To this point everything is more or less clear but people find it hard to find more parameters for -Accessright, which is actually the most important part of the command. Here they are:

  • FullAccess
  • SendAs
  • ExternalAccount
  • DeleteItem
  • ReadPermission
  • ChangePermission
  • ChangeOwner

Examples in Action

Realworld example:

##
Add-MailboxPermission -Identity SanFrancisco -User "simpleCompany San Francisco ACL" -Accessright FullAccess -InheritanceType all
##
Share

Windows Hates USB Drives

Not sure why but Windows is always throwing little tantrums when I attach a USB drive.  None of the other operating systems I use complain, but Windows complains nearly every time.  I think it can smell the Unix.

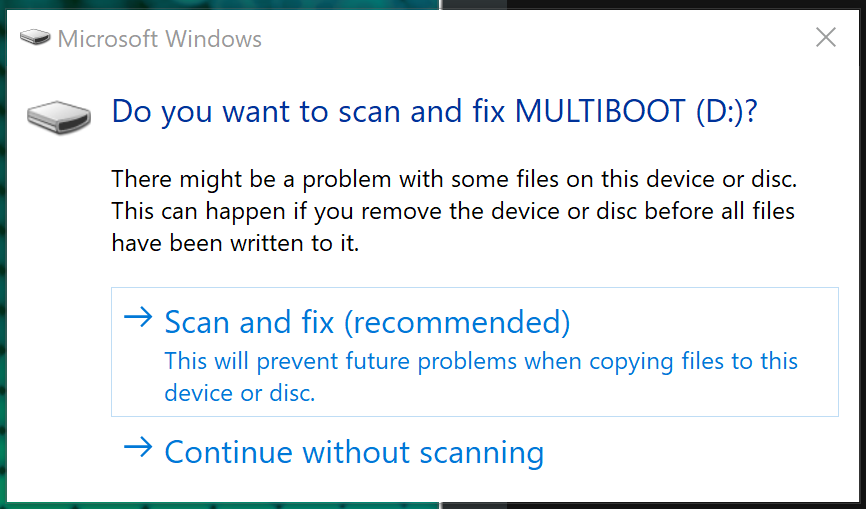
When I first attach a drive it will probably confront me with this terrifying message of doom.

What to do?
What to do?

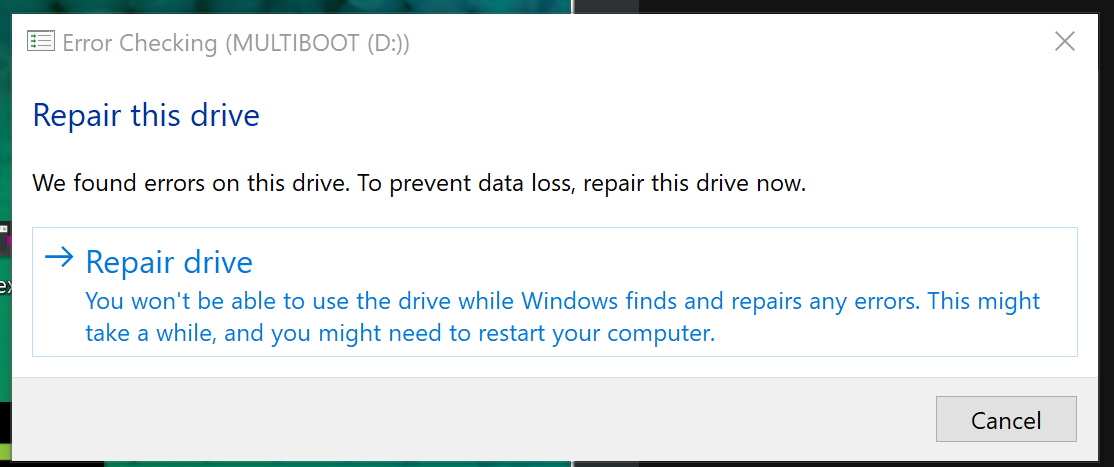
Continuing without scanning always works fine, but if I should ask it to scan and fix (as they so thoughtfully recommend) I get the obligatory “are you sure?”, because (of course) “Scan and fix” means “scan and… that’s it”.

Er... repair?
Er… repair?

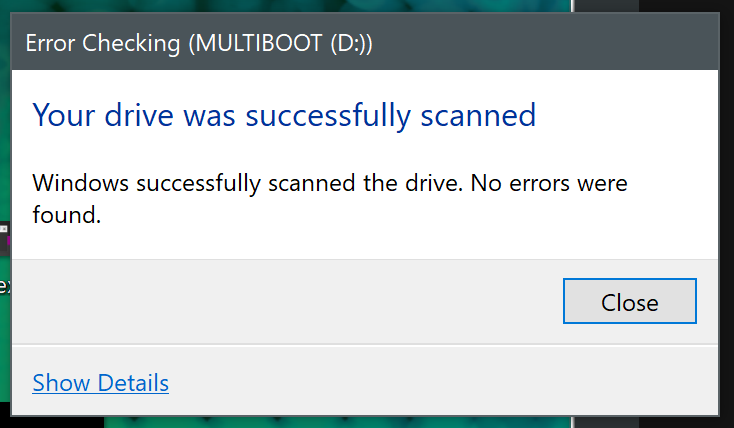
Oh, shit.  They found errors!  Better fix them.  I mean it’s the only option at this point.  (Canceling is just giving up.)

The No Error!
The No Error!

I’m pretty much doomed.  Save yourself!

Share

So You Wanna Do C++ Programming on Windows

You must update Win10 to the latest version before you will be able to enable the Windows Subsystem for Linux and Ubuntu (which is where you will find bash). It is best to do this over a wired connection as it will go faster and more smoothly.

Enable the subsystem:

  • Hit the Windows key and locate the Control Panel
  • Now locate the Programs and Features panel and double-click on it
  • Click the “Turn Windows features on or off” link on the left
  • Check the box for “Windows Subsystem for Linux” and click the “Ok” button

Install Ubuntu:

  • Hit the Windows key and locate Microsoft Store
  • Search for Ubuntu (“ubu” is probably sufficient)
  • Install Ubuntu (no need to sign in if prompted)

Enable developer mode:

  • Hit the Windows key and click the Settings gear on the left of the Start menu
  • Choose Update & Security (it’s the last entry)
  • Choose “For developers” on the left
  • Choose the “Developer mode” radio button

Reboot:

  • You’ve made some changes; time for a quick reboot
  • Once you are back, launch Ubuntu from the Windows menu and let it set itself up
  • If you let Ubuntu set itself up, these are the same steps as outlined in Setting up Bash

Setting up bash:

  • Open a command prompt (cmd), a PowerShell prompt, or a Terminal in Visual Studio Code (aka VSCode) and type bash
    • (This will cause bash to run through a basic set up.)
  • Enter new UNIX username:
    • Use your Windows username as that’s easiest to remember
  • Enter new UNIX password:
    • Use your login password for Windows again because it’s easiest
  • Retype your UNIX password:
    • Type your login password again so you’re sure it’s correct

If cmd complains bash doesn’t exist…

  • Open the Microsoft Store application
    • Win –> type store
  • Install Ubuntu
    • search for Ubuntu or bash
    • Click the “Get the apps” button in the “C:\> Linux on Windows?” box
    • Choose Ubuntu (free)
    • Click the “Get” button
  • Go back to “Setting up bash” above except you’ll need to locate and launch Ubuntu from the Windows Start menu

Update Ubuntu (the subsystem which is running bash):

  • sudo apt update
    • (you will be asked to invisibly enter your password)
  • sudo apt upgrade
    • (answer y)
  • sudo apt autoremove
  • sudo apt autoclean
  • # or simply use this:
  • sudo apt update && sudo apt upgrade ; sudo apt autoremove ; sudo apt autoclean

(Those last two are not strictly necessary but are a good practice to use.  If too much time passes between any of these sudo commands you will be asked to enter your password again.)

Install the g++ compiler:

(This is not required if you are just adding bash to Windows.  It’s an open source C++ compiler.)

  • sudo apt install g++
    • (answer y)

The final piece of this puzzle is the (optional but pleasant enough) VSCode (free community) version of Visual Studio.  You can get that for Windows, Mac, and Linux directly from this site.

Remember to have fun!

Share

Mac Lock Screen Keyboard Shortcut(s)

The following is a method for creating a keyboard shortcut on a Mac such that the shortcut will lock the screen. This method involves using the Mac’s Automator and a bit of shell script. It is also important to set certain settings. We are going to show two different shortcut options. They can be run in parallel if desired. They also may be modified within reason and remain equally effective.

Launch Automator

  • From Automator choose File –> New –> Service which will open a new automation dialog
  • Here you have two (inclusive) options:
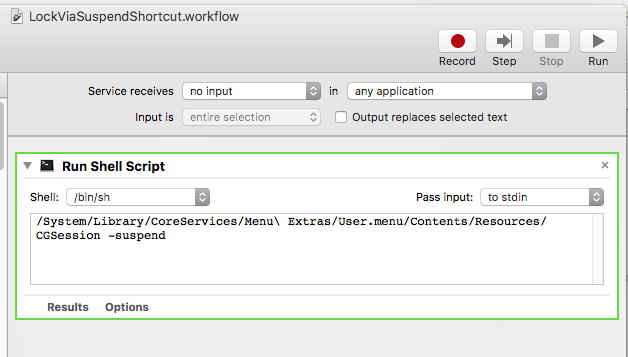
    • From the automation dialog select Utilities from the left-hand pane and then Run Shell Script
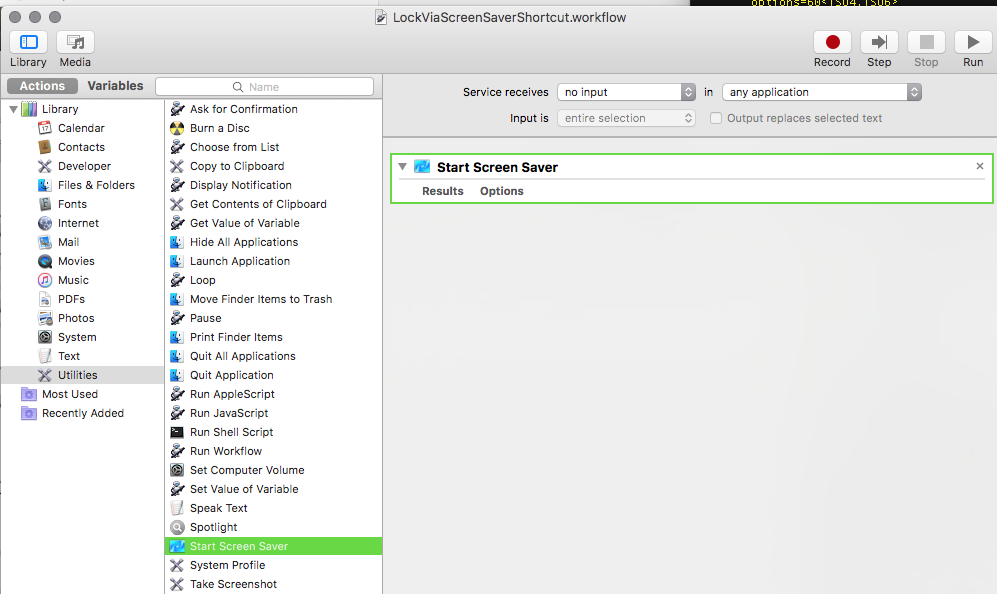
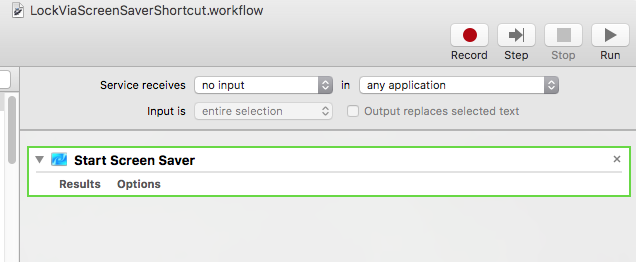
    • From the automation dialog select Utilities from the left-hand pane and then Start Screen Saver (pictured)
Utilities: Run or Start
  • What’s the difference?
    • The shell script puts the system directly into the suspended state.
    • Suspending the system (via script) is slower but requires no additional settings.
    • Launching the screen saver does just that.
    • Launching the screen saver requires certain screen saver settings (below) and is faster.

The Automation (Two Options)

  • This is the line of code for you to copy and paste as below: /System/Library/CoreServices/Menu\ Extras/User.menu/Contents/Resources/CGSession -suspend
  • Again you will follow either the Run Shell Script path or the Start Screen Saver path:
    • Note the “no input” and the “any application” settings in both drop-downs for both methods below.

Via Shell Script (using Suspend):

  • Call the Run Shell Script something clear: LockViaSuspendShortcut
  • This is the line of code for you to copy and paste as above: /System/Library/CoreServices/Menu\ Extras/User.menu/Contents/Resources/CGSession -suspend
    • You will see the argument -switchToUserID for CGSession as well. This does not lock the screen. Do not use it.)
  • The Shell Script method (using suspend):
Lock via Script
Lock via Script

Via the Screen Saver:

  • … or Call the Start the Screen Saver something clear: LockViaScreenSaver
  • The Start the Screen Saver method:
Lock via Screen Saver

Note:

  • If you need to delete an Automator Workflow, you can locate them in ~/Library/Services/
  • It may be possible to make an automation available to all users (untested) by placing it in /Library/Application Support/Apple/Automator/

Set Up the Keyboard Shortcut(s)

  • Once you have created these automations, you will only need to assign a shortcut for each.
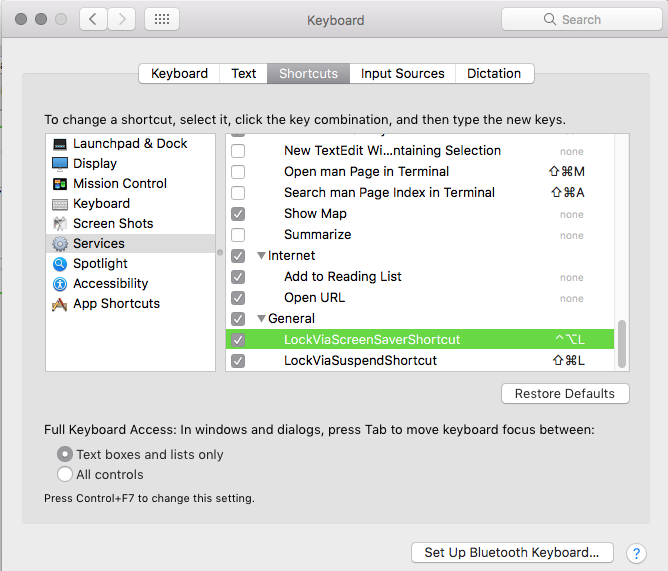
  • Navigate to System Preferences –> Keyboard –> Shortcuts –> Services
  • Since you have used clear names per the above, you will have no difficulty identifying which automation is which.
Shortcuts
Shortcuts
  • The field to the right of the name of the automation holds the key combination.
  • Choose what you’d like and choose wisely.
    • LockViaScreenSaverShortcut is set as ctrl-alt-L
    • LockViaSuspendShortcut is set as shift-super-L
  • The mouse may need to be out of a VM in order for the shortcuts to be captured by the Mac.

Additional Screen Saver Settings

  • Open System Preferences –> Desktop & Screen Saver –> Screen Saver
  • Set “Start after:” as “5 Minutes
  • Open System Preferences –> Security & Privacy –> General
  • Set “Require password” as “5 seconds
    • These fives seconds will give you a small buffer to keep your screen from locking if you are reading an article and it goes blank.
Share

Date and Time on the Windows Command Line

What a mess.  All you want to do is insert a timestamp into a file name so as to make it easily organizable.  That ought to be simple, right?

Wrong!

What a mess.  There are two real issues at the heart of this.  First, Windows is deathly afraid of nine characters:

\ / : * ? ” < > |

To Windows, those are the most frightening things imaginable.  Do you feel the fear?!  None of their file systems (from FAT16 to NTFS) can manage files using those characters.  Don’t get me wrong, some of those characters can be problematic in a file name.  Can be.  But this prohibition really gets in the way.  Think about how time is formatted literally everywhere.  And who doesn’t love the value of the question mark…

The second issue is that the content of the DATE variable is inexplicably the result of the region and not independent of the region.  So, if a user changes the date display according to where they are, if they change it from the default, the output of the DATE variable is different and must be parsed differently.  (The same problem exists with the TIME variable and the 24 hour clock.) . Again, unfathomable why anyone would use this as a starting point.

In short, I can’t offer a definitive line of code for giving a file name an up to the second timestamp.  I can only offer a line that may or may not need to be tweaked for a given user.

This is for the default date and time settings:

%date:~-4,4%%date:~-10,2%%date:~-7,2%_%time:~0,2%%time:~3,2%%time:~6,2%

This allows you to create a command like this:

move file.txt %date:~-4,4%%date:~-10,2%%date:~-7,2%_%time:~0,2%%time:~3,2%%time:~6,2%_file.txt

This slices up the DATE and TIME variables (using ~ and then some basic coordinates) to give a result (with an underscore between the date and the time).  If the user is employing a different date (or time) format you’ll have to play around with the coordinates to grab the correct chunk.  Best of luck.

Go get ’em, tigers!

Share

Rotate Android Videos in Ubuntu

It seems that if I don’t have my phone angled just so, it will invisibly rotate my video.  The rotation at the beginning of the film is what is used throughout, so if you think you have it horizontal and it turns out your first frame was vertical the entire film is then vertical.  And you won’t realize this until you attempt playback.

There are probably a million and one ways to fix the video rotation.  Unfortunately none of those are built into the phone.  I downloaded the video onto my laptop (running Ubuntu 16.04).

Most of the advice I found was to use a program called Avidemux.  I have used it in the past to change audio or video codices or move a video into a different container/wrapper (to mkv for example), and I have found it useful enough.  However, it would appear that Avidemux is no longer present in the usual Ubuntu repositories as both apt and the Ubuntu Software Center did not find it.

I poked around and found a pretty simple command line rotation solution using ffmpeg here.  I tried the version of the command in the response, but encountered an error:

[aac @ 0x6cf380] The encoder ‘aac’ is experimental but experimental codecs are not enabled, add ‘-strict -2’ if you want to use it.

Since my phone uses aac (apparently) I needed to add the -strict -2 in order to enable an experimental encoder.  So metal!

ffmpeg -i Desktop/VID_20161008_144216.mp4 -vf “transpose=2” -strict -2 Desktop/VID_20161008_144216_rotatecc.mp4

It worked great.  The response offers some other rotation options, but of course the man page for ffmpeg is extensive.

Share

Notes from Possible cifs-utils Bug

Here follow my testing notes concerning a problem which has arisen in the way file shares are being accessed from various Ubuntu client machines.  I am listing behaviors for both the “Connect to Server” function (via Nautilus) and those involving the mount command (especially via the fstab file).

Files and folders used to be accessible and they now are not.  These notes will help determine the exact cutoff point for the failures, though sussing out those points could be exacerbated if there are multiple causes for the errors.

The test scenario is as follows.  There is an Ubuntu server (which happens to be running 10.04 though this is not critical at present).  This Ubuntu server has multiple shares.  Various files and folders within these shares contain (at least) two known effected characters:  the colon (:) and the question mark (?).

When those locations are mounted by mount (whether via fstab or no) using a 12.04 client machine the files and the folders which contain either (or both) of those characters in their respective paths are accessible as would be expected for any such file share.

(It is of interest to note that for this particular Samba configuration, the server is not using “mangled names” (mangled names = no).  Enabling mangled names would eliminate the characters in question and thus make testing irrelevant.)

Below you will find testing results for Nautilus and mount (for each character tested) as well as version information for cifs-utils (used by mount).

(I have tested Nautilus to help eliminate server issues as a concern, but as you will see there appears to be an issue with Nautilus as well.  For my purposes, I am testing with an eye toward fixing the problem with mount and fstab.  Perhaps after I have managed that I will look again at the Nautilus problem.)

Finally, I am not a developer.  I will be doing all the testing I am able and I will file the appropriate bug reports.  I would also work with developers to perform any testing as might prove useful.

From /etc/fstab:

//server/share    /media/share        cifs    guest,iocharset=utf8 0 0

Ubuntu 12.04

  • Connect to Server (Nautilus)
    • ? folders and files function as expected
    • : folders show “- -“, throw error when opened; files play
  • mount fstab
    • ? folders and files function as expected
    • : folders and files function as expected
  • apt-cache policy cifs-utils:
    • Installed: 2:5.1-1ubuntu2
      Candidate: 2:5.1-1ubuntu2
      Version table: 2:5.1-1ubuntu2 0
      2:5.1-1ubuntu1 0

Ubuntu 14.04.5

  • Connect to Server (Nautilus)
    • ? folders and files function as expected
    • : folders show “- -“, throw error when opened; files play
  • mount fstab
    • ? folders show “0 items”, throw error when opened; files error
    • : folders show “0 items”, throw error when opened; files error
  • apt-cache policy cifs-utils:
    • Installed: 2:6.0-1ubuntu2
      Candidate: 2:6.0-1ubuntu2
      Version table: 2:6.0-1ubuntu2

Ubuntu 14.10

** 14.10 is out of service and thus I cannot download cifs-utils.

  • Connect to Server (Nautilus)
    • ? folders and files function as expected
    • : folders show “- -“, throw error when opened; files play
  • mount fstab
    • ?
    • :
  • apt-cache policy cifs-utils:
    • Installed:
      Candidate:
      Version table:

Ubuntu 15.04

  • Connect to Server (Nautilus)
    • ? folders and files function as expected
    • : folders show “- -“, throw error when opened; files play
  • mount fstab
    • ? folders show “0 items”, open but empty; files play
    • : folders show “0 items”, open but empty; files play
  • apt-cache policy cifs-utils:
    • Installed: 2:6.0-1ubuntu2
      Candidate: 2:6.0-1ubuntu2
      Version table: 2:6.0-1ubuntu2 0

Ubuntu 15.10

  • Connect to Server (Nautilus)
    • ? folders and files function as expected
    • : folders show “- -“, throw error when opened; files play
  • mount fstab
    • ? folders show “0 items”, throw error when opened; files error
    • : folders show “0 items”, throw error when opened; files error
  • apt-cache policy cifs-utils:
    • Installed: 2:6.4-1ubuntu1
      Candidate: 2:6.4-1ubuntu1
      Version table: 2:6.4-1ubuntu1 0

Ubuntu 16.04.1

  • Connect to Server (Nautilus)
    • ? folders and files function as expected
    • : folders show “- -“, throw error when opened; files play
  • mount fstab
    • ? folders show “0 items”, throw error when opened; files error
    • : folders show “0 items”, throw error when opened; files error
  • apt-cache policy cifs-utils:
    • Installed: 2:6.4-1ubuntu1
      Candidate: 2:6.4-1ubuntu1
      Version table: 2:6.4-1ubuntu1 500

Ubuntu 16.10

  • Connect to Server (Nautilus)
    • ? folders function as expected; files do not show at all
    • : folders show “- -“, throw error when opened; files error
  • mount fstab
    • ? folders show “0 items”, throw error when opened; files error
    • : folders show “0 items”, empty folder icon when opened; files error
  • apt-cache policy cifs-utils:
    • Installed: 2:6.5-2ubuntu1
      Candidate: 2:6.5-2ubuntu1
      Version table: 2:6.5-2ubuntu1 500

And that is that.  We shall see where this takes me.  Thanks for reading.

Share