Category Archives: Networks & Wireless

Fuck Comcast

Comcast used to give me a static IP address for five dollars a month.  This is exorbitant (as you will see below), but it was paradise to pay compared to what they are doing today.

First a word about IP addresses.

For IPv4, this pool is 32-bits (232) in size and contains 4,294,967,296 IPv4 addresses. The IPv6 address space is 128-bits (2128) in size, containing 340,282,366,920,938,463,463,374,607,431,768,211,456 IPv6 addresses.

So for IPv4 (what is most commonly used still) there are about 4.2 x 10^9 and for IPv6 (newish but growing slowly) there are about 3.4 x 10^38 total addresses.  If we were limited to IPv4 we would be having some minor difficulty getting addresses assigned around the globe.  Mostly that’s not an issue because mostly individual computers sit on local networks and don’t need public addresses.  These numbers are really only about pubic facing addresses.

Think about that scale for a moment.  Let’s look at the math.

340282366920938463463374607431768211456 ÷ 7631836561 = 4.458721884×10²⁸

So, every human on the planet could have their own pool of addresses (just from IPv6 because at this point the IPv4 address aren’t even a rounding error by comparison) and they would get a pool of about 4.5 x 10^28 addresses.  To put that in perspective the the mass of the earth is 5.98 x 1027 grams.  How much is a gram of dirt worth?  This is the scale we are at with addresses.

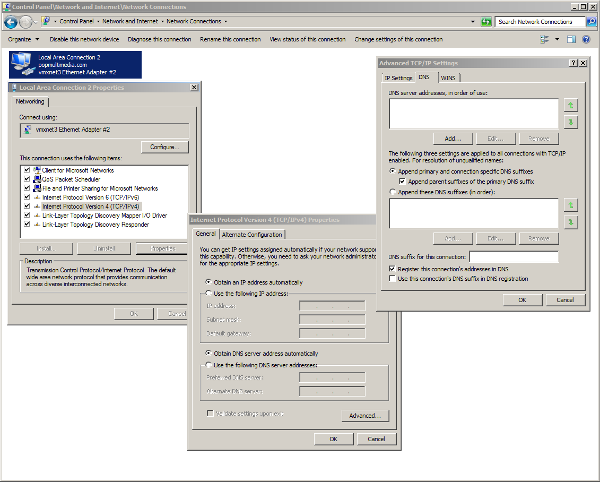
Comcast will charge $30 per month for an IP address (a static address).  Let’s break that down.  In order to get a static address you must have a business account which is an increase in your monthly fee of (at least) $5.  Then you will need to pay the monthly fee they charge for the static lease which is now $15.  Finally, you must rent a modem from Comcast at $10 every month.  (I may have those numbers reversed but either way it’s the same math.)

You may think “oh, I’ll save some money and buy my own modem”.  Good thought.  That’s what I did.  But it turns out they are now geared to fuck anyone who tries to escape that fee.  They are currently refusing to assign static leases to customer-owned modems.

They will tell you it’s not possible, but this is what I do for a living.  You can assigned a static lease to any device on your network by several various means, and it doesn’t matter who owns that device, who made that device, or what sort of device it is.  You only need the MAC address of the device (which is easy to provide and which I have repeatedly offered).

They are lying.  In addition to it being technically possible, I also know this from experience with Comcast.  Remember this is what I do for a living.  I have set up businesses around town with their own modems, with Comcast as an ISP, and with static addresses many times over the years.  I know too of specific business with this arrangement currently.

So, in short Comcast is charging any customer who asks for one thirty dollars for one-tenth of one gram of dirt.

Fuck Comcast.

Share

UniFi Controller and Ubuntu

I bought a UniFi wireless access point.  Expensive but supposed to be about the nicest you can get for the money.  I have high hopes.

Anyway, I was a little worried about getting it set up using their software as so much of the talk was Windows centered.  I didn’t need to worry.

This article gave me the commands I needed to install the software and run it on Ubuntu natively.

First add this repository:

deb http://www.ubnt.com/downloads/unifi/debian stable ubiquiti

Then run these commands in sequence (make sure you are up to date before you begin).

##
#

# First get the key for the repository you just added
sudo apt-key adv --keyserver keyserver.ubuntu.com --recv C0A52C50

# Update your repository lists and install unifi
sudo apt-get update
sudo apt-get install unifi

# Check to see unifi is running
sudo service unifi status

##

You are supposed to be able to visit https://:8443/ but I had to add localhost to the URL, so you may want to try this instead:

https://localhost:8443

When you first visit the controller, it will walk you through a basic set up process.  That’s pretty much it.

Share

DNS in Windows with No Local Access

A user here at work borked one of their Windows 7 virtual machines after installing a VPN client and making some DNS/hosts changes.  There uninstalled the VPN client (something from SonicWALL) but the issues persisted.

IPconfig had some interesting clues, but some external sites were also having intermittent issues: sometimes gmail or google or amazon would or would not work.  This seemed DNS related.

Nonetheless, I wanted to eliminate the possibility that the VPN hadn’t left something altered.  I thought perhaps there was something related to the NIC so I removed and re-install the NIC drivers.  This did nothing.

My co-workers insisted I remove the virtual NIC and add another in its place.  I insisted killing the driver was a sufficient test, but since they kept going on about it I killed the virtual NIC just to silence them.  This did not work: it neither fixed the issue nor did it silence my helpful audience.

My admittedly brilliant network-guru boss even kicked me out from my terminal to hack away at it for a bit.  I wasn’t able to wrestle my desk back until the user in question asked for his machine back and I insisted I had to leave for the day.  I resolved to fix it first thing in the morning.  Sometimes a fresh perspective is all you need.

That and some gardening, I suppose.

Anyway, the next morning I went to work on one of the suggestions of my co-workers by trying to find some sort of removal tool for the already-removed VPN client.  In doing so, I noticed two things that started working in the back of my mind.  First, DNS resposes sometimes included an incorrect fully-qualified suffix.  Second, I was seeing the IP address of 127.0.53.53 for this VM.

I found this article on the IP address 127.0.53.53 and discovered that this was in fact a sort of error message.  In short it’s your network complaining that there is some degree of name collision happening.  This strengthened my position that it was a DNS issue.

I abandoned the whole un-installer nonsense and started poking around the network preferences.

If you open your network connections, you can find at least one connection to follow along.

Network Settings
Network Settings

Here you can see both your IPv4 and IPv6 entries.  You may want to check both of them (future proof?).  Anyway, pick one and click the Properties button.

Local Area Connection Properties

Nothing much to see here.  Just head directly to that Advanced button.

IPv4 Properties
IPv4 Properties

Here is the meat.  This is where you control your DNS suffixes.  This is default.

Advanced TCP/IP Settings

Funny thing, Windows has two radio button choices for how to deal with DNS suffixes.  The first reads “Append primary and connection specific DNS suffixes”.

The second reads thus “Append these DNS suffixes (in order):”.

The interesting thing to note is the total lack of reference to the primary suffix if you choose the list.  You must include the primary (and any connection specific) if you use the second option.  His list did not include them.

Long rabbit hole with a simple solution.  I added the (in our case one) primary suffix at the top of the list and corrected the local access issue.

Share

Some Good and Bad News in Ubuntu 14.04

I have been upgrading certain machines here at work and testing various items along the way.  First one item of concern.

There is a great package out there for Windows domain integration called likewise-open.  We had a 13.10 machine running and connected to our Windows domain using this package.  It’s a great package and it really streamlines the domain membership problem.

Unfortunately there is currently no 14.04 package available in the repositories.  The machine we upgraded is currently not able to log in using domain credentials.  Since it’s Friday at 16:09, I created the user a local administrative level account and we’ll look to doing more as is necessary (but surely next week).

I imagine this package will appear in the repositories before long.  We shall see.  Just be forewarned if you are planning to upgrade any Windows domain connected Ubuntu machines any time soon.

But there is a nice delight to offset this.  The old vmware-view-client package which was broken due to a misplaced dependency and which has finally been removed from earlier-version repositories has been replaced in the 14.04 repositories with a working version.  Now you can use vmware-view-client to attach to your View sessions and you can do so using the VMWare native PCoIP protocol.

Have fun with that.

Share

Installing dd-wrt without Windows

I won’t pretend to understand why the makers of dd-wrt would make all the installation tools Windows executables, but they have.  I mean, it’s a Linux based firmware.  Silliness.

Fortunately I didn’t need Windows to use their tools.  I was able to download their files and run them all under Wine in Ubuntu 10.04 for my Linksys WRT54g without any troubles—until I arrived at Step 20.  Their tftp.exe wouldn’t run under Wine.  Turns out, though, I didn’t need to use their tftp.exe at all.

In case you are not already using Wine, you can find it in Synaptic easily enough.  You should not need to perform any special configurations.

You will want to replace Step 20 with a manual ftp installation of some kind.  I used TFTP.  You can install TFTP through Synaptic or by entering sudo apt-get install tftp at the command line followed by your password when prompted for it.

Either way you’ll want to have a terminal open for the next bit.

Once TFTP was installed I went to my terminal and changed into the directory where my dd-wrt file (mine was called dd-wrt.v24-12548_NEWD_micro.bin) was located on my local machine: cd /path/to/dd-wrt/location

Then I merely ran the following TFTP commands.  Once I entered the first command below I was taken to an FTP prompt (that’s the > pictured in the commands below).  You won’t need to type that; it’s just here to separate the FTP commands from the terminal commands.  You can leave FTP and return to your terminal by typing q or quit at the FTP prompt (and hitting Enter, duh).

tftp 192.168.1.1
> binary
> rexmt 1
> timeout 60
> put dd-wrt.vXX_XXX.XXX.bin

When it worked my terminal returned the message “Sent 1703936 bytes in 2.6 seconds”.

(You needn’t worry much about Step 21 or Step 22 either.)

Also, I was twice prompted by dd-wrt on the router to set a password.  Once when I installed it and once again after I hard-reset it (Step 24).  That’s normal.  Just go with it and pick a nice complex secure password.

You can find the instructions for installing dd-wrt on a WRT54g v5 here.  Just remember to refer to the above when you get to Step 20 (if you are using Linux).  Their site has a strong catalog of routers which can run dd-wrt.  Hopefully yours will be among them.

They also sell certain routers with dd-wrt already installed in case that’s a better starting point for you.  Check out their home page.

Good-bye Windows.

Share