Category Archives: Hacks & Slacks

Bookmarklets

Err… what’s a Bookmarklet?

A bookmarklet is a bit of JavaScript disguised as a bookmark that, when run, can perform a specific bit of work via your browser.  These below are generally built to satisfy some search need, to make these searches easier, more seamless, and less annoying.  Try one; try them all!

I have tested these and they all work as-is in the latest (2023-01-19) versions of Opera, Chrome, and Firefox.

If you run into trouble, try updating your browser or disabling all extensions before altering the JavaScript.

(If clicking the bookmarklet dialog does not spawn a new tab with your target, I have seen Firefox act a fool and need changed to %27.  But probably check your updates and extensions.)

HowTo:  Install and Use a Bookmarklet

The short version:

  • Triple-click the line of JavaScript code to highlight it.
  • Drag and drop that line of code to your browser’s Bookmarks Bar to create a bookmark.
    • If drag-and-drop doesn’t work, created any bookmark and edit to substitute the js as the destination and name it accordingly.
  • Right-click that newly created bookmark to edit the name.
    • Suggested names are provided above each JS line.  I like to keep the names short so more fit on the bar.
  • Rinse and repeat for all you’d like below.  Or create your own.

Usage

Once you have a bookmarklet installed, there are two ways to use it.  You can either highlight any text on the page and click the bookmarklet, or (if no text is highlighted on the page) a search dialog appears when the bookmarklet is clicked.

Of note, iframe contents cannot be seen, only the wrapping page.  In these circumstances a dialog will always spawn.

These are all built to open a new tab, which should open next to (to the right of) your current working tab.

These can be leveraged for many searches one does throughout the day, thus greatly increasing the efficiency of said searches.  I’ve been building and using them since 1999 and will continue to do so.

Bookmarklets

GitHub

// 
// GitHub https://github.com/search?q=searchthis 
// gitH 
javascript:q=""+(window.getSelection?window.getSelection():document.getSelection?document.getSelection():document.selection.createRange().text);if(!q)q=prompt("Search GitHub for… ").replace(/\s\+/g,"%252B");if(q!=null)window.open("https://github.com/search?q="+q);void(0); 
// 

Amazon

// 
// Amazon https://www.amazon.com/s?k=searchthis&crid=2SHRP43MFNSJ8&sprefix=searchthis%2Caps%2C386&ref=nb_sb_noss 
// Amazon+s 
javascript:q=""+(window.getSelection?window.getSelection():document.getSelection?document.getSelection():document.selection.createRange().text);if(!q)q=prompt("Search Amazon for… ").replace(/\s\+/g,"%252B");if(q!=null)window.open("https://www.amazon.com/s?k="+q);void(0); 
// 

LinkedIn

// 
// LinkedIn https://www.linkedin.com/search/results/all/?keywords=searchthis&origin=GLOBAL_SEARCH_HEADER&sid=cVD  
// LI+s 
javascript:q=""+(window.getSelection?window.getSelection():document.getSelection?document.getSelection():document.selection.createRange().text);if(!q)q=prompt("Search Amazon for… ").replace(/\s\+/g,"%252B");if(q!=null)window.open("https://www.linkedin.com/search/results/all/?keywords="+q);void(0); 
// 

Confluence

Adjust URL for your instance.

// 
// Confluence 
// https://esentire.atlassian.net/wiki/search?text=narf 
// C+s 
javascript:q=""+(window.getSelection?window.getSelection():document.getSelection?document.getSelection():document.selection.createRange().text);if(!q)q=prompt("Confluence [try words]…").replace(/\s\+/g,"%252B");if(q!=null)window.open('https://esentire.atlassian.net/wiki/search?text='+q);void(0); 
// 

SolarWinds

Adjust URL for your instance.

// 
// SolarWinds https://YOURINSTANCE/ui/search?q=%s 
// SW+s 
javascript:q=""+(window.getSelection?window.getSelection():document.getSelection?document.getSelection():document.selection.createRange().text);if(!q)q=prompt("SolarWinds [try a sensor number]…").replace(/\s\+/g,"%252B");if(q!=null)window.open('https://YOURINSTANCE/ui/search?q='+q);void(0); 
// 

ServiceNow

Adjust URL for your instance.

// 
// ServiceNow ticket search https://YOURINSTANCE.service-now.com/nav_to.do?uri=%2F$sn_global_search_results.do%3Fsysparm_search%3D%s 
// SN+s 
javascript:q=""+(window.getSelection?window.getSelection():document.getSelection?document.getSelection():document.selection.createRange().text);if(!q)q=prompt("Service-Now [try a sensor number]…").replace(/\s\+/g,"%252B");if(q!=null)window.open('https://YOURINSTANCE.service-now.com/nav_to.do?uri=%2F$sn_global_search_results.do%3Fsysparm_search%3D'+q);void(0); 

// ServiceNow direct ticket search (no iframe) 
// this takes you to a ticket directly if search results are unique 
// SN+cs 
javascript:q=""+(window.getSelection?window.getSelection():document.getSelection?document.getSelection():document.selection.createRange().text);if(!q)q=prompt("ServiceNow Case Number: ").replace(/\s\+/g,"%252B");if(q!=null)window.open('https://YOURINSTANCE.service-now.com/text_search_exact_match.do?sysparm_search='+q);void(0); 

// ServiceNow knowledge base article search 
// SN+KB 
javascript:q=""+(window.getSelection?window.getSelection():document.getSelection?document.getSelection():document.selection.createRange().text);if(!q)q=prompt("Search for a KB").replace(/\s\+/g,"%252B");if(q!=null)window.open('https://esentire.service-now.com/selfservice?id=search&spa=1&q='+q);void(0); 
// 

Under the Hood

As you will note from the JavaScript, each of these bookmarklets performs a variable substitution (here named q) into the URL sent back to the server performing the search.  As such, one would perform any URL substitution.

For example, at one job I was able to create several bookmarklets for accessing various config pages on devices by substituting the device names.

// 
// so if you begin with a URL like  
// https://devicename.company.internal:5555/path/to/configX 
// you can massage that into a bookmarklet something like  
javascript:q=""+(window.getSelection?window.getSelection():document.getSelection?document.getSelection():document.selection.createRange().text);if(!q)q=prompt("Config X for device…").replace(/\s\+/g,"%252B");if(q!=null)window.open("https://"+q+".company.internal:8834/path/to/configX");void(0); 
// 

The possibilities are pretty limitless.
Share

Sorting Lines in VSCode

Stay tuned for a more elegant version…

copy some lines then

This comes up at the top of searches still so I’ll add this latest solution. If you are running a current VS Code (and why wouldn’t you?) you can use the built-in sorter by hitting ctrl-shift-p (Mac is cmd-shift-p) and type “sort” in the subsequent search box. There are many options.

https://stackoverflow.com/questions/3350793/sort-selected-text-from-visual-studio-context-menu

Share

High Bitrate ISO Music to FLAC

Here is the process I used to convert some DVD-audio ISO files into proper FLAC files for inclusion in my main collection.  No compromise in channels nor in audio quality required.

These instructions are for Ubuntu but will likely work on most Linux distributions (since ffmpeg and flac are so common).  Mac?  Maybe.  Win10 with bash?  Probably.

The basics are as follows:

  • mount the ISO (or extract the relevant files)
  • use ffmpeg to extract audio data into wav files
  • stitch multiple wav files together using Audacity or ffmpeg
  • split that full-album wav into individual songs
  • convert those wav songs into FLAC files
  • tag and move into the main collection

Often mounting an ISO is a matter of right-clicking and choosing Mount; regardless I leave it up to you to make that happen in whatever manner you choose.  All that matters is that we can access the files through a specific file path. (Alternatively you can extract the relevant files to an accessible file path for the subsequent commands.)

You will need to fun ffmpeg against each audio file from the mounted ISO in order to get a complete collection of wav files to conjoin.  My most recent ISO had two and this command is for the second extraction:

##
ffmpeg -i ~/Desktop/ISO/AUDIO_TS/ATS_01_2.AOB ~/Desktop/RW/02_end.wav 

# run ^^this^^ line for each file containing audio and with a unique file name (in order) 

# you can use the following line to stitch two (or more by modification) wav files into a single long file 

ffmpeg -i ./01_start.wav -i ./02_end.wav -filter_complex '[0:0][1:0]concat=2:v=0:a=1[out]' -map '[out]' full.wav 

# you can see above you'd need to add more -i (input) files and you'd want to alter the bit before and the bit after concat to correspond with the correct number of files 
##

Either use the above command to stitch all files together or open all your files in Audacity (or whatever you’d like) and paste each track against the end of the previous track until you have one project containing the entire audio content.  Export that as a single wav file.

Audacity will default to exporting as a two-channel 16×44 wav file.   You can change the bitrate in the lower-left of the project window.  For multi-channel exports, you’ll need to navigate to Edit → Preferences → Import/Export → When exporting tracks to an audio file → Use custom mix (radio button).  Now you are set to wave the full wave file.

Next you get to struggle with dividing the full file into individual songs.  This can be made all the more challenging if your album is progressive rock.  Who needs gaps between so-called songs?  Anyway, I can not offer much advice though there is this handy page from Audacity that could help.

You can do it!

Converting into FLAC is really easy.  It’s probably the easiest step in the whole process.  (Splitting into individual songs is probably the least easy if you’re keeping track.)

##
# cd into the folder where your newly created wav files are located and run flac itself 

flac --best --channel-map=none -V *.wav 

# you only need --channel-map=none if your full-length file has more than two tracks  
##

Once that has finished, you can tag your music.  I use EasyTag because it’s easy.

Share

A Couple Recent Conversions for Audio and Video

I’ve had to make a couple of unusual conversion of late and wanted to make note of the solutions for my future self.  Hey, future self, git with it!

First, converting dsf (and I think also dff) files into flac files I just used ffmpeg as follows:

## 
# first cd into the directory containing the dsf files in question, then… 
ffmpeg -i 15-Penny\ Lane.dsf 15-Penny\ Lane.flac 
##

Then I also needed to convert an ISO into some constituent mkv files. For this I used makemkv.

## 
# first you'll need to install it from the Snap repositories.  
snap install makemkv 
# then open the graphical application and point it at your ISO.
##

Both pretty handy, easy, and fool-proof. I’m the fool. I’m the proof. Good hunting.

Share

Change Default Mail on Mac without Launching Mail

I clicked on a mailto link at work again.  Happens from time to time.  The Mac popped up Apple’s Mail as though that might help.  I kept meaning to change my default mail application; maybe today was the day?

Anyway, all of the instructions you will find tend to be, well, the same instructions:  open Mail, open Preferences, do some other stuff.  The trouble is that unless you set up a mail account in Mail you cannot open the Preferences.

Outlook used to have a setting for taking default, but that has gone away because Security!

Anyway, I found a solution (here) involving a small amount of Python which worked perfectly.  Nothing to install.  Just copy and paste and you’re good to go.  If you are not using Outlook, you’ll have to look up whatever the bundle identifier would be for your application of choice.  Here’s the code.

##
/usr/bin/python2.7 <<EOF
import LaunchServices;
result = LaunchServices.LSSetDefaultHandlerForURLScheme(
    "mailto",
    "com.microsoft.Outlook")
print("Result: %d (%s)" % (
    result,
    "Success" if result == 0 else "Error"))
EOF
##

(The use of EOF should allow you to copy and paste the entire block into a terminal without having to separately paste each line.)

Have fun with that!

Share

VSCode, Ubuntu, and Pylint

If you are running VSCode on Ubuntu and working with Python files, you may notice it telling you that Pylint isn’t installed and that you should choose a linter.  I don’t know much about linting or why I should care, but I do know that I don’t need VSCode alerting me each time I touch a Python file that Pylint isn’t installed.

So I looked into it.

Turns out I do have Pylint installed.  Turns out it is installed right where it would be expected.  Turns out that is a location which is in my PATH, by default.  Turns out that VSCode already knows all of this.  At least I can which pylint in the VSCode terminal and get an answer.  In fact, I get the correct answer.

And yet VSCode thinks it’s not installed.

It’s an easy enough fix.

##
# Add this change to your personal user settings file in VSCode:

// 20190420 Because VSCode can't find it...
"python.linting.pylintPath": "/usr/local/bin/pylint",
##

(I always make a note including the date whenever I make a change in a configuration file. Can be important later.)

Make that change and restart VSCode.  You should stop seeing this error.  You can read more about this here.

Share

Powershellish Mailbox Creation

Found these old notes for making a post.  Figured I may as well move the notes here even if they are less relevant.  Maybe it will be useful to someone.

Mailbox Creation

Sometimes those old Exchange gui’s just ain’t enough. Time to bust out the command line. Here is some very useful information about doing just that.
So, of course, there is a special command prompt you will want to use: the Exchange Management Shell.

Main Data

I pulled this directly from the MS helps pages in Exchange. I did, however, add the very important (and neglected) identifier for each of these five mailbox types (at least my best guess):

User Account:

##
New-Mailbox -Name -Database -OrganizationalUnit -Password -UserPrincipalName [-ActiveSyncMailboxPolicy ] [-Alias ] [-DisplayName ] [-DomainController ] [-FirstName ] [-Initials ] [-LastName ] [-ManagedFolderMailboxPolicy ] [-ManagedFolderMailboxPolicyAllowed ] [-ResetPasswordOnNextLogon <$true | $false>] [-SamAccountName ] [-TemplateInstance ]
##

Linked Account:

##
New-Mailbox -Name -Database -LinkedDomainController -LinkedMasterAccount -OrganizationalUnit -UserPrincipalName [-ActiveSyncMailboxPolicy ] [-Alias ] [-DisplayName ] [-DomainController ] [-FirstName ] [-Initials ] [-LastName ] [-LinkedCredential ] [-ManagedFolderMailboxPolicy ] [-ManagedFolderMailboxPolicyAllowed ] [-Password ] [-ResetPasswordOnNextLogon <$true | $false>] [-SamAccountName ] [-TemplateInstance ]
##

Room Account:

##
New-Mailbox -Name -Database -OrganizationalUnit -Room -UserPrincipalName [-ActiveSyncMailboxPolicy ] [-Alias ] [-DisplayName ] [-DomainController ] [-FirstName ] [-Initials ] [-LastName ] [-ManagedFolderMailboxPolicy ] [-ManagedFolderMailboxPolicyAllowed ] [-Password ] [-ResetPasswordOnNextLogon <$true | $false>] [-SamAccountName ] [-TemplateInstance ]
##

Equipment Account:

##
New-Mailbox -Name -Database -Equipment -OrganizationalUnit -UserPrincipalName [-ActiveSyncMailboxPolicy ] [-Alias ] [-DisplayName ] [-DomainController ] [-FirstName ] [-Initials ] [-LastName ] [-ManagedFolderMailboxPolicy ] [-ManagedFolderMailboxPolicyAllowed ] [-Password ] [-ResetPasswordOnNextLogon <$true | $false>] [-SamAccountName ] [-TemplateInstance ]
##

Shared Account:

##
New-Mailbox -Name -Database -OrganizationalUnit -Shared -UserPrincipalName [-ActiveSyncMailboxPolicy ] [-Alias ] [-DisplayName ] [-DomainController ] [-FirstName ] [-Initials ] [-LastName ] [-ManagedFolderMailboxPolicy ] [-ManagedFolderMailboxPolicyAllowed ] [-Password ] [-ResetPasswordOnNextLogon <$true | $false>] [-SamAccountName ] [-TemplateInstance ]
##

Examples in Action

Create a shared mailbox:

##
new-Mailbox -alias testsharedmbx -name TestSharedMailbox -database "Mailbox Database" -org Users -shared -UserPrincipalName testsharedmbx@example.com
##

Realworld example:

##
new-Mailbox -alias sanfrancisco -name SanFrancisco -database "Mailbox Database" -org "simplecompany.lan/simpleCOMPANY/Resource Accounts" -shared -UserPrincipalName sanfrancisco@simplecompany.lan
##

Notes:

  • alias is the whatever@
  • name relates to the display name

Adding Permissions

Main Data

##
Add-MailboxPermission
Add-MailboxPermission -Identity "Some User" -User DonaldK -Accessright Fullaccess -InheritanceType all
##

To this point everything is more or less clear but people find it hard to find more parameters for -Accessright, which is actually the most important part of the command. Here they are:

  • FullAccess
  • SendAs
  • ExternalAccount
  • DeleteItem
  • ReadPermission
  • ChangePermission
  • ChangeOwner

Examples in Action

Realworld example:

##
Add-MailboxPermission -Identity SanFrancisco -User "simpleCompany San Francisco ACL" -Accessright FullAccess -InheritanceType all
##
Share

Mac Lock Screen Keyboard Shortcut(s)

The following is a method for creating a keyboard shortcut on a Mac such that the shortcut will lock the screen. This method involves using the Mac’s Automator and a bit of shell script. It is also important to set certain settings. We are going to show two different shortcut options. They can be run in parallel if desired. They also may be modified within reason and remain equally effective.

Launch Automator

  • From Automator choose File –> New –> Service which will open a new automation dialog
  • Here you have two (inclusive) options:
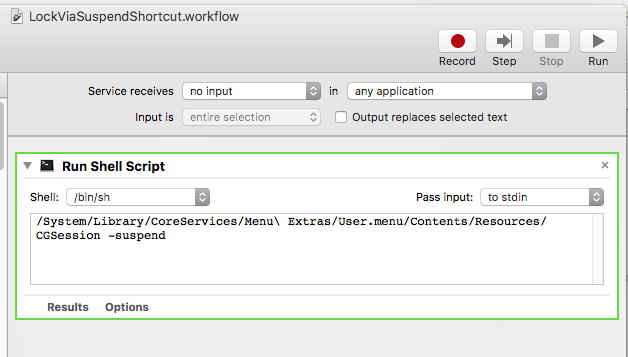
    • From the automation dialog select Utilities from the left-hand pane and then Run Shell Script
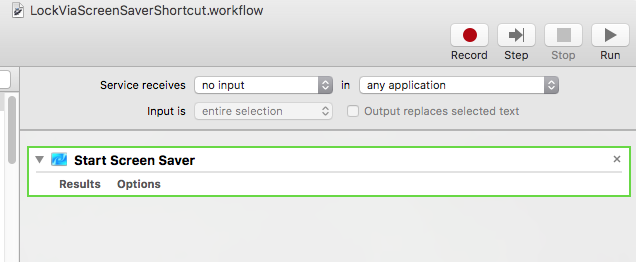
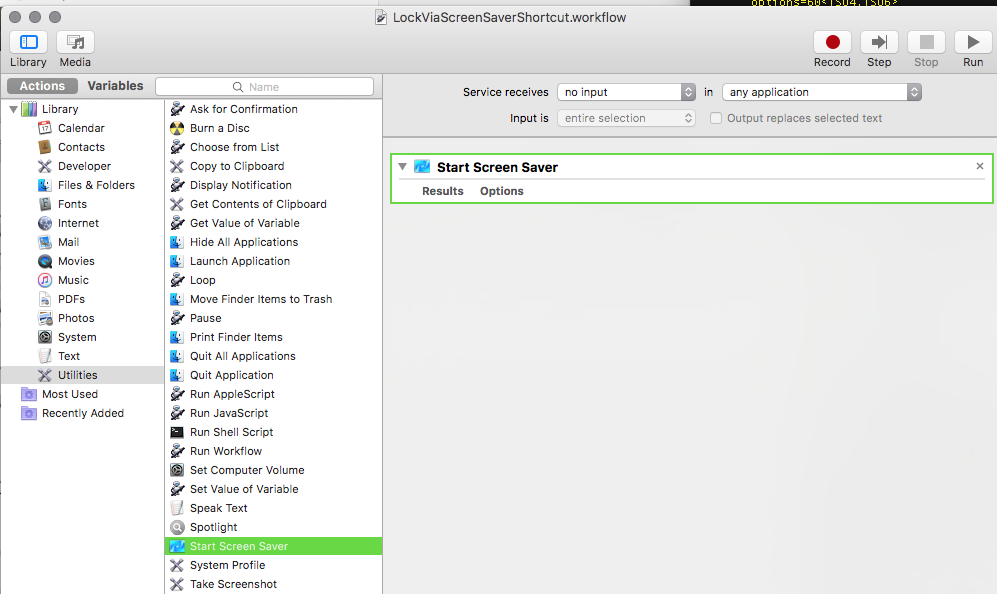
    • From the automation dialog select Utilities from the left-hand pane and then Start Screen Saver (pictured)
Utilities: Run or Start
  • What’s the difference?
    • The shell script puts the system directly into the suspended state.
    • Suspending the system (via script) is slower but requires no additional settings.
    • Launching the screen saver does just that.
    • Launching the screen saver requires certain screen saver settings (below) and is faster.

The Automation (Two Options)

  • This is the line of code for you to copy and paste as below: /System/Library/CoreServices/Menu\ Extras/User.menu/Contents/Resources/CGSession -suspend
  • Again you will follow either the Run Shell Script path or the Start Screen Saver path:
    • Note the “no input” and the “any application” settings in both drop-downs for both methods below.

Via Shell Script (using Suspend):

  • Call the Run Shell Script something clear: LockViaSuspendShortcut
  • This is the line of code for you to copy and paste as above: /System/Library/CoreServices/Menu\ Extras/User.menu/Contents/Resources/CGSession -suspend
    • You will see the argument -switchToUserID for CGSession as well. This does not lock the screen. Do not use it.)
  • The Shell Script method (using suspend):
Lock via Script
Lock via Script

Via the Screen Saver:

  • … or Call the Start the Screen Saver something clear: LockViaScreenSaver
  • The Start the Screen Saver method:
Lock via Screen Saver

Note:

  • If you need to delete an Automator Workflow, you can locate them in ~/Library/Services/
  • It may be possible to make an automation available to all users (untested) by placing it in /Library/Application Support/Apple/Automator/

Set Up the Keyboard Shortcut(s)

  • Once you have created these automations, you will only need to assign a shortcut for each.
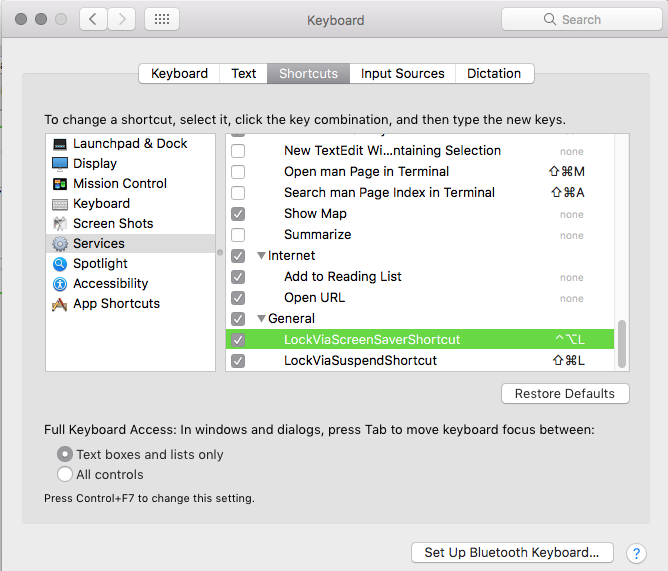
  • Navigate to System Preferences –> Keyboard –> Shortcuts –> Services
  • Since you have used clear names per the above, you will have no difficulty identifying which automation is which.
Shortcuts
Shortcuts
  • The field to the right of the name of the automation holds the key combination.
  • Choose what you’d like and choose wisely.
    • LockViaScreenSaverShortcut is set as ctrl-alt-L
    • LockViaSuspendShortcut is set as shift-super-L
  • The mouse may need to be out of a VM in order for the shortcuts to be captured by the Mac.

Additional Screen Saver Settings

  • Open System Preferences –> Desktop & Screen Saver –> Screen Saver
  • Set “Start after:” as “5 Minutes
  • Open System Preferences –> Security & Privacy –> General
  • Set “Require password” as “5 seconds
    • These fives seconds will give you a small buffer to keep your screen from locking if you are reading an article and it goes blank.
Share