Category Archives: Windows

Windows Update Failing for No Reason?

I’ve built a couple of new Lenovo T420s laptops at work the last couple of days.  On both machines Windows Update refused to check for updates:

Windows Update cannot check for updates, because the service is not running. You may need to restart your computer.

Being that I had repeatedly restarted the machine as I built it and added different software I was convinced that yet another reboot would not help the matter.  I rebooted anyway.  It did not help the matter.  (“Windows, you lied to me!”)

I checked the service and found that it was running as expected.  I restarted it just for shits and giggles.  It restarted smoothly and rapidly.  This also did not help the matter.

Finally I opened Windows Update and clicked on “Change settings”.  I told Windows Update to “Never check for updates (not recommended)”.  After re-opening Windows Update I set it back to my usual setting, and like magic it checked for updates.

Confused little application…

Anyway, hope that helps you.

Share

7-Zip on Windows 64 Bit Machines

I have been using 7-Zip as a compression utility for a long time now.  No more troubling with WinZip or WinRAR, both of which have distinct disadvantages: WinZip is a run-all-the-time resource hog while WinRAR is proprietary and non-free.  7-Zip runs all the usual compression algorithms in both directions plus adds functionality for the new 7z compression format.

In Windows 7-Zip also adds context menu (right-click) functionality for compression and decompression actions.  The thing is I was having trouble getting that functionality to function on my Windows 7 machine.  Turns out I had made a simple (and easy) mistake.

They make both a 32 and 64 bit version of 7-Zip.  The 32 bit version works just fine on a 64 bit Windows machine.  However, the 32 and 64 bit architectures of Windows make different use of the context menu; in short they are done in a different manner.  So, even though the application seemed to be working perfectly the context menu information was (presumably) erroring out behind the scenes.

No big thing.  Just uninstall the 32 bit version and install the 64 bit version (third link down currently).  Voila!  Context menu options.

Have fun with that.

Share

Call-to-Click Breaks Unrelated Functions

I had a user who was not able to paste into Outlook by any method other than plain text.  I took a look at the situation and it was in fact Office-wide: no Microsoft Office application (Word, Excel, &c) was giving any paste options except plain text and a simple ctrl-v would also paste plain text.

It turns out that this stems from a known conflict between Office and Skype’s Click-to-Call.  Click to call is an additional application installed when you install Skype which supposedly gives your browser the ability to send telephone links directly to Skype.  I say supposedly for two reasons.  First of all I have never used either Skype to make this sort of call nor have I ever encountered a telephone link in a Web page.  Second (of only two) you shouldn’t need an entire application to tell a browser how to handle a telephone link.

For your edification a telephone link is basically just like a mailto link (for handling e-mail addresses in Web pages):

Click <a href=”tel:1-800-555-1212″>here</a> for 800 information.

Nothing too terribly exciting.  Outlook or Thunderbird (or any other mail application including Web mail applications) won’t need a separate application to tell your browser (Opera, Firefox, Safari, Chrome, IE, &c) what to do with a mail link.  Likewise one ought to be able to merely tell the browser or operating system how to handle this type of link.

And the odds are you are not using these links anyway.

The solution for my user was to remove Skype Click-to-Call from their system.  This brought back the expected paste options throughout Office.  If they need to make a call from a phone number they find on-line they can probably still just click on the link.  If that fails, it’s only ten digits: type it into Skype directly—or just copy and paste it into Skype.

Removing Skype Click-to-Call will not effect the normal operation of Skype for textual, voice, or video chat.  I don’t know when they added it, but you don’t need it.

Hope that helps you.  Have fun.

Share

Pin (Formerly My) Computer (or Any Location) to the Windows 7 Taskbar

Pinning things to the Taskbar is pretty useful.  I would say even more useful than the previous Quick Launch.  The trouble is that there are some things which simply will not be pinned so easily.  Like an oiled badger, you just can’t wrangle them.

Unless of course you have spiky ninja gloves.  Here are some spiky ninja gloves.

I found both this and this article discussing very similar methods for pinning unusual (to Microsoft) objects to the Taskbar.  I will distill things a bit for you here and you can refer to either of those articles should you want more information.

Basically there are two steps.  First you create a shortcut (on the desktop for example).  Then you pin that shortcut to the Taskbar.  (At which point you can discard the superfluous shortcut.)

Creating a shortcut is very easy.  Right-click somewhere (either on your desktop or in any Explorer folder) and choose New —> Shortcut.  You will be presented with the Create Shortcut dialog.  It has a place for you to paste an address (or you could Browse to a specific location).  Here I show you two different paths which will work for (formerly My) Computer:

%SystemRoot%\explorer.exe /E,::{20D04FE0-3AEA-1069-A2D8-08002B30309D}

%SystemRoot%\explorer.exe shell:MyComputerFolder

Either one of them should work.  I see no reason to prefer one over the other.  (Perhaps someone else will offer some insight in the comments.)  Anyway, paste one of those into your Create Shortcut dialog and click Next.  Name it whatever you’d like (Computer might be appropriate or perhaps you’d like to use the actual name of your machine?) and click Finish.

That’s the hard part.  The easy part is now you right-click on this newly created shortcut and choose Pin to Taskbar.  That’s it.

Again, there are other things and locations you might like to pin to your Taskbar.  This should be a good launching point.  You can find more clever path ideas here.

(This should work for Vista and from what I can tell Windows 8 as well.)

Hope that helps you do your thing better.  Who the hell wants to visit Libraries ever?  Have fun with that.

Share

Using YUMI to Create Multi-Boot Thumbdrives

Lately I’ve had good cause to use bootable thumbdrives.  To the point where I am now finding use for having a single 16 GB thumbdrive which contains various different bootable utilities and installation discs.

Over at PenDriveLinux I was able to download a program called YUMI (Your Universal Multiboot Installer) for creating multi-boot environments on a single partition (of a thumbdrive).  It’s pretty basic to use but I wanted to take a moment to mention some quirks which might throw off a first-time user.

You can use it to create boot options for nearly anything you might imagine.  I haven’t found anything as yet which would not work (though they may exist).

First of all, you might get an error at boot time that the files (within the ISO you are booting) must be contiguous.  I ran into this problem when I built a Windows 8 preview on my thumbdrive.  You can see my article here for how I defragmented the contents of the ISO.

Another oddity that might trip you is the file names of the ISO’s you download.  YUMI has expectations about what those files will be named.  You choose what you are going to attempt to install, then you seek the file, and you might find that YUMI ignores the file you think is the correct file.

Look near the bottom of YUMI where is listed “Step 3: “.  You will see YUMI specifies a file name for which it is seeking (the file name may include a wildcard).  You just want to rename your ISO so that it matches the name YUMI specifies in that step.  (It will not display the name until you click the “Browse” button and then click the “Cancel” button to return to the main application window.)

That was about it.  If I notice any other quirks I’ll post them here.

Have fun with that.

Share

Compact and Easy Windows Defragger

The built-in degragmentation tool in Windows (any version) rather, to put it politely, sucks giant iguana balls.  Seriously.  It’s like when you ask a kid to clean up his or her room and they stuff all their crap into the closet.  My brother used to do that.  We still laugh about it.

My brother has moved on to be a rōnin-chef, and as such has developed a high art when it comes to cleaning a kitchen.  (I haven’t inspected his bedroom closet but work with me here.)  Microsoft hasn’t moved.

For a long time I was installing Diskeeper, which I still really like.  The problem with using Diskeeper, aside from the expense of buying a license for any machine where you should choose to use it,  is its lack of portability.  Though I would still recommend Diskeeper (even if Windows 7 is much better about not fragmenting files than any previous version was).

However, for those times when you need a portable solution I have found one.  It’s called WinContig (as in contiguous) and it’s a free download.  (Perhaps there is a way to donate but I didn’t find it.)

Another great feature of WinContig (and the main reason I downloaded it) is that it can defragment ISO files.

What?

I downloaded the new Windows 8 preview and wanted to add it to my list of bootables on my multi-boot thumbdrive and it would not run because the files needed to be contiguous.  Defragmenting the thumbdrive itself did nothing to help (the drive wasn’t defragmented).  WinContig was able to defragment the contents of the ISO file and thus solve the problem.

(I’ll write a separate article on building my thumbdrive.)

Anyway, now in my utilities folder I have a copy of WinContig (separate 32 and 64 bit executables).  Great to have that in my pocket.  Hope it helps you live a little better.


Share

Surveyor of the Foistest

You may recall how annoying I found the alleged update of iTunes called Safari.  You may also have been amused by my railing against the equally alleged update to Windows called Silverlight.  Microsoft has delivered a new alleged update called Bing Desktop.  It’s craptacular.

It will appear at the bottom of your list of updates.  You will want to avoid checking that box if it’s not and you will want to uncheck it if it is.  You don’t want a large Bing-enabled search box in the middle of your desktop.  It’s just not worth it.

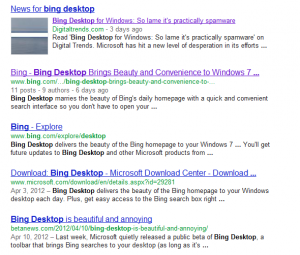
I was highly entertained by the Google search results when I went to look up Bing Desktop to discover what it was and why it was among my most recent updates.

Google Bing Desktop Results

These are the top five search results using “bing desktop”.  You will note that three of them are from Microsoft.  First I clicked on the Bing result and recognized it as pure marketing.  I went back and chose the Digital Trends link.

What I found incredibly funny (laughing out loud funny; neither ironic nor lol) was that the marketing tag was “Brings Beauty and Convenience” while the actual news article calls the software “So lame it’s practically spamware”.

So, yes: don’t bother.  Actively avoid it; you don’t need it.

Have fun.

Share

Windows Wants a New Printer

I recently had the privledge of setting up a new networked printer for the Seattle Tilth.  I really enjoy working with organizations like this because I feel like I’m helping to make the world a better place.  At any rate, they will need to attach various users to that networked printer and I thought I’d just write an article in case others might also benefit from these instructions.

Please read through the entire article before you begin.

I have included instructions specific to Windows XP and Windows 7.  (The Windows 7 instructions should also work with Windows Vista.)

Some printers do require that a specific driver be downloaded from the printer manufacturer’s Web site, but that was not the case here.   The network printer they received through donation was an HP Color LaserJet 4650, but a reasonably clever person could use these same instructions to add other printers as well.

(Note: initially I used DHCP but we ran into a problem and are currently testing a static address.  I’ll report back when I know better.)

Let’s start with Windows XP.

  • Open the Control Panel and choose Printers and Faxes (Start –> Control Panel –> Printers and Faxes)
  • Click Add Printer
  • You will be adding a network printer and you will choose the third bullet option
  • Here you will enter the address of the printer which is based upon the name given to the printer, and since I named mine simply HP4650 the address is http://hp4650 (don’t worry about letter case when it’s Microsoft); if that doesn’t work you may have to use the actual IP address which in their case was 192.168.0.253 so http://192.168.0.253
  • Finally select HP Color LaserJet since there is no listing specifically for the 4650
  • OK your way out of these dialogs
  • Print a test page and rejoice

Now for those Windows 7 instructions.

  • Open the Control Panel and choose Devices and Printers (Start –> Control Panel –> Devices and Printers)
  • You will be adding a network printer and you will choose the second button as such
  • On the left (manufacturer) side select HP
  • On the right (specific printer) side select HP Color LaserJet 4650 PCL 5
  • If this printer does not appear in the list click the Windows Update button and try again
  • OK your way out of these dialogs
  • Print a test page and rejoice

In both cases you will likely want to choose this as your default printer when presented with that option.  You can always change your default printer by locating the printer you want as your default under Printer and Faxes or under Devices and Printers, right-clicking on the printer in question, and choosing Make Default or Set As Default.

Easy enough?  Hope it helps you heaps.

Share

Repairing Grub after Windows Breaks It

Recently I built my dad a dual boot system with Ubuntu 10.04 and Windows XP. He likes his games so he wanted to keep a Windows installation for gaming. Fine. Built, tested, delivered.

However, he had a bad video card (and some other issues) and he had a friend help him at various stages. He lives on the other side of the state with a mountain range in between us so I understand.

Anyway, to make a long story a little shorter and to emphasize my confusion, I received the machine in the following condition. First, Windows 7 had been installed. This of course broke all that I had done with my dual boot. My Ubuntu installation, which had been controlling boot loading with Grub, was borked and the Windows 7 installation was on what appeared to be a failing hard drive. Instructions? Make it work.

First thing I did was just to reinstall Ubuntu so as to take control of boot loading again and since it was a fresh installation anyway, why not? Then I used GParted to move the partitions around to make room for the Windows 7 installation on the same drive where the other installations were. This fixed Ubuntu and Windows XP, but Windows 7 (whether the original or the copy) would not boot. (Sometime around here I removed the old 7 drive from the machine which I believe to be failing.)

I tried all the usual shit. Various Grub configurations, various Windows boot configurations, moving around the boot flag, updating Grub at various moments. Bah! Nothing would improve matters if I chose 7: the basic black screen and quickly flashing cursor that meant the machine was waiting for an operating system to take over.

Using Grub to point to XP and then trying to use the Windows boot menu to choose between 7 and XP brought in a host of its own problems. Fuck it. I threw in the towel and rebuilt the 7 partition(s).

Now Windows 7 was working great but this of course broke my Grub again. So once again I went back in with chroot and updated Grub. This wasn’t enough, but while looking up the commands for doing this I noticed a utility called boot-repair. It can be downloaded as a stand-alone ISO or it can be used within Ubuntu.

If you run the Ubuntu Live CD you can simply run these two commands to install and run boot-repair:

sudo add-apt-repository ppa:yannubuntu/boot-repair && sudo apt-get update
sudo apt-get install -y boot-repair && boot-repair

You can read more about its usage here. I ran it with the normal settings (after perusing the Advanced options) and it fixed my boot problem. Now all three operating systems boot from the Grub menu.

This boot-repair has some pretty cool options (like selecting which boot option is default). Definitely worth adding to your toolbox.

Share

Attach Ubuntu to Windows Domain via Active Directory (+ sudo)

There may not be too many advantages to adding your Ubuntu machines to your Windows domain, but if you think of them this will allow you to work toward them.  It’s actually pretty easy to add a Linux box to Active Directory.  This is true because AD started out life as an LDAP server and it still retains its LDAP genes somewhere deep inside its withered exterior.

First thing you will want to do is add this utility to your Ubuntu machine:

sudo apt-get install likewise-open

It will allow you to authenticate against AD using Kerberos.  If you don’t know what that means it’s not important at this stage; it’s enough to understand that it’s a secure method for assuring identity between your client machine and your AD server.

I then added the machine to the domain.  Again this is a simple operation.  Before you do anything on the Ubuntu machine, hop into Active Directory and create a machine account in the name of the Ubuntu machine.  Then back on the Ubuntu machine it’s one line of code:

sudo domainjoin-cli join [domain.name] [username]

Easy enough.

Further I added a domain group to the local sudo group by adding these lines to the /etc/sudoers file.  You can also add a domain user.  Just note the different formats below:

# Active Directory group [groupname] given sudo privs
%[domain.name]\\[group^name] ALL=(ALL) ALL
[domain.name]\\[username]

If you don’t know how to edit a protected file like /etc/sudoers I recommend using Gedit:

gksudo gedit /etc/sudoers

(If you manage to break your sudoers file, you can always use pkexec visudo -f /etc/sudoers to fix it.)

Just add those two lines to the end of the file.  The first line is just a comment line and could say something different.  Replace those items in the square brackets with the appropriate information to your network.  Groups, as you can see, are preceded by a percent sign while users are not.  Any spaces should be replaced by carets.

For the group I created in Active Directory to grant these sudo privileges (called Ubuntu Sudoers) I included Domain Administrators and a couple of individuals who would likely be using the Ubuntu box and need sudo rights.  The combinations available should make this pretty flexible.

Anyway, that’s about it.  Not too exciting but sure it’s useful for something.  Have fun with it.

For newer versions of Ubuntu you will need to enable a login space on the login screen.  There are a number of ways, but this is nice and simple.  Again open GEdit to edit a file.

gksudo gedit /etc/lightdm/lightdm.conf

Then add this line to that file.

greeter-show-manual-login=true

You may be able to get the domain assumed (at login) using this method but there is more discussion here.

gksudo gedit /etc/samba/lwiauthd.conf

Then add this line to that file.

winbind use default domain = yes

If that does not work, you can just use the domain@username format at the login screen.

Have fun with that.
Share