Category Archives: OS

Operating Systems

Update JoinMe as a Normal User

Sometimes it may be faster to launch and update JoinMe as the currently-logged-in user rather than logging out as that user and logging back in as an administrator.  In those cases you can follow these instructions to launch and update JoinMe as a privileged user without logging out as the current user.

  • Open a Terminal
  • Switch user to root (su root); you may have to su to administrator first
  • Launch JoinMe: /Applications/join.me.app/Contents/MacOS/join.me
  • JoinMe will launch and update successfully, then you should close JoinMe
  • Now you may launch JoinMe from the Dock as the user
  • Remember to exit out of your changed user session in the Terminal (and close the Terminal if appropriate)

(This is important only only on a Mac.  Windows doesn’t require elevation to run this update.)

That’s it.

Share

Return Customizations to Unity in Ubuntu 13.10

Possibly the greatest disappointment associated with the move from Gnome2 to Gnome3/Unity in Ubuntu has been the massive evisceration of user customization.  I am pleased to report there is now a tool which will return many of those old customizations (nearly everything I was lamenting) and which will add some new (and in my case predicted) feature enhancements.

You can get the Unity Tweak Tool by entering this line in your terminal (and then entering your password).

sudo apt-get install unity-tweak-tool

Alternatively, you can search for Unity Tweak Tool in either the Ubuntu Software Center or Synaptic.  However you install it, let’s take a look at some of the stuff I like.

Open your Unity Tweak Tool and let’s take a look under the hood.

It’s divided into four sections: Unity, Window Manager, Appearance, and System.  Under each of those sections is a group of sub-sections which become tabs once you select one of them.  I’m not going through all of them, but feel free to explore them all at your leisure.

Under Unity –> Launcher –> Appearance you can adjust the opaqueness level and the opaque color of the launcher sidebar on the left of your desktop.

Likewise, under Unity –> Panel –> General you can adjust the opaqueness of the top panel.

You will well notice that some of the items you can adjust here also live in various locations in your System Settings.  You can adjust those particular settings in either location.  I’m only going to mention those unique settings found in the Unity Tweak Tool and which (as previously mentioned) I like.

Now, under Window Manager –> Workspace Settings –> General you can set your workspace color.  For the sake of uniformity, I set this to the same color as my launcher.  I also expanded my workspaces to 3 x 2 (from the default 2 x 2).

Under Window Manager –> Window Snapping –> General I make the same color change for the fill color (and change the outline color to an appropriate compliment).  Then under Behaviour I set them as follows starting with the upper-left corner (clockwise): Top Left Corner, Top Half, Top Right Corner, Right Half, Bottom Right Corner, Bottom Half, Bottom Left Corner, and Left Half.

This is something I’ve been anticipating.  This gives you left-right half and top-bottom half snapping for most windows (test it by dragging a terminal or browser window to the appropriate area of the screen), but it also gives you quadrant snapping (which you can test by dragging those same windows to any of the four corners).  I’m very pleased with this one.

Under Windows Manager –> Hotcorners I only set one thing.  At the top-right I set “Spread all Windows“.  If you throw your mouse to the appropriate location on the screen you see all of your open windows splayed out for you to select one.  If you do that by mistake you can merely throw your mouse to the same area and you are back to where you were.

Finally, one of my old favorites is back and accessible in an easy manner.  Under Windows Manager –> Additional –> Focus Behaviour I change “Focus mode:” to “Mouse“.  Try this out and see what you think.  It changes things so that wherever is your mouse hovering, the there-below window has focus.

(The one drawback of this feature is that it can be tricky to get to the application menus, since you may have to find a path to the top bar which does not cross another application—or those available menus will change to those of that passed-over application.)

Next you can bring back window shading.  That’s when you double-click the title bar of a window, the window rolls itself up leaving only the title bar visible.  Another double-click unrolls it.  You’ll find that under Windows Manager –> Additional –> Titlebar Actions –> Double click: and you’ll choose Toggle Shade.

Finally for Windows Manager –> Additional –> Resizing I again make the outline and fill colors uniform to what I’ve chosen for my color scheme.

If you want to move the buttons (close, minimize) on your windows, you can choose either left or right from Appearance –> Window Controls –> Layout –> Alignment.

That’s what I change.  Feel free to comment on your preferences.

I have noticed that once a change is made (like moving the buttons on the windows from left to right) the Tweak Tool may report the incorrect location after a reboot.  This seems innocuous since the buttons remain persistently in your chosen location; it’s merely that the tool reports the default location incorrectly.

Hope that helps you make your environment look good and be more efficient for your workflow.
Share

Trillian Comes to Ubuntu

Technically “is coming” is more correct.  Currently the Linux version of Trillian is in beta.  If you are a Trillian Pro user (I am) you have free access to the beta, which is currently available as a .deb package.  They have assured me that a repository is coming.  I haven’t tried to use this .deb on my 64 bit machines yet, so I can’t say if it will work.

Nonetheless, this is very exciting news for fans of Trillian and users of Linux.  It has long been the best and most useful multi-protocol communications client out there.  They released a Mac client a few years back, but I don’t think anyone was expecting this announcement on their blog:

Trillian for Linux: Early access for Pro customers!

I’m looking forward to participating in the testing, of course, but I’m also looking forward to seeing this emerge from beta.

Thanks, Cerulean.

Share

Mac Gets Spaced out of Bounds

You may have heard some of the cool kids discussing Spaces and wondered “what’s that all about?”.  Or not.  Many Mac users don’t even know about this feature.  I came from years of using Linux systems where having multiple desktops was the norm.  Before Apple introduced Spaces I was using a third-party application to provide that feature-set.  (I have done the same thing on Windows as well.  You can read about that here.  Ubuntu, of course, still has it natively.)

Recently I encountered an oddity with Spaces which deserves a mention.

Normally with Spaces enabled you can simply Super-<up arrow> (command-<up arrow> or Apple-<up-arrow> or Windows-<up arrow>) to get to the Spaces control area (also known as Mission Control).  That was working fine.  However, once in this control area one ought to see a + in the upper-right corner by which one can spawn an additional space into Spaces.

I knew it had been there at one time, but at some point I noticed it was missing.  Not a big deal.  I could still create new spaces for full-screen applications; I just couldn’t create an empty desktop.  A minor annoyance.

In researching a mildly unrelated item I was reading this thread.  One user mentioned the bug whereby if your Dock is docked to the right-hand side of your screen (mine is) the + is MIA (mine was).  The the kicker reply came informing that commenter that with the Dock on the right the + was on the left.

It’s not exactly true.  You have to mouse over to the upper-left corner and the space and + fly-out from the left edge.

So that little mystery is solved.

Share

Virtual Workspace Upgrade

I have previously mentioned Virtual Dimension.  It’s a great way to add multiple desktops to Windows (which Linux and even Mac support natively by now).  Unfortunately, it looks like VD hasn’t been updated since 2005.  (You can see my previous mention of VD here.)

There are a number of other potential candidates worth testing.  There is VirtuaWin (this is the one I switched to when VD started failing me).

There is this Google Code project called Pager extension.  (I haven’t tested this one.)

Here are a couple othersto round things out.  One for XP and Vista and a more general one.  (I have tested neither of these.)

As you can see I haven’t really kept up with these applications.  That’s because I almost never have to use a Windows machine, and I certainly don’t use one as a main machine any more.

Feel free to post your opinions about these (or any other) desktop virtualization applications in the comments.

Share

My Apple Dongle Ain’t Driver’d

I was asked to sort out why a Lenovo ThinkPad X1 Carbon was not allowing a user to log in using his domain credentials.  It was throwing an error claiming that the AD server was not available.

This is somewhat normal as the first time a user logs into our domain they are often required to connect via wire.  Let’s ignore why that is the case and just accept it for now.  The problem is, however, the Carbon lacks an Ethernet port.

Ah, but we have plenty of those Apple USB –> Ethernet adapters.  I’ll just attach one of those.

That was fine.  It even showed correctly identified in the Device Manager.  The driver install failed silently and the device was accompanied by the usual yellow triangle of shame.  So I right-clicked on the device and asked it to install the driver.  It failed with a useless error message which I haven’t bothered to record into my memory.

Turns out you can’t install this driver (which Windows either includes or retrieves from Microsoft—I didn’t load it on myself) because it is an “unsigned” driver.  Do you see the problem here?  Windows downloads a driver from Microsoft (or the OS comes with the driver in a CAB somewhere) but what it downloads it doesn’t trust.  That’s like me not trusting what I have in my pocket: it looks very much like my house key but I just can’t be sure.

Anyway, who cares if they are bumblers.  You just want to know how to solve the problem.  I took the following steps from this site.

  1. Either roll your mouse to the lower-right corner and click the Settings icon or hit Windows-I.
  2. Click “Change PC Settings” (or similar) at the bottom of that Settings side-bar.
  3. Under PC Settings click General.
  4. Scroll to the bottom on the right-hand pane and click the “Restart now” button under “Advanced startup”.  (This doesn’t reboot “now”.  There are more steps.)
  5. On the “Choose an option” menu which follows choose “Troubleshoot”.
  6. On the “Troubleshoot” menu choose “Advanced options”.
  7. On the “Advanced options” menu choose “Startup Settings”.
  8. On the “Startup Settings” menu click the “Restart” button.  (This will reboot your system.)
  9. On this (totally different) “Startup Settings” menu choose 7 (literally type a 7).

This will reboot your system with “driver signature enforcement” disabled.  This should allow you to install the driver (by right-clicking in the Device Manager).

Once you have done that you can merely reboot to re-enable that, er, feature.  (The page linked above also includes instructions for disabling this permanently.  I have not tested this, nor would I consider it a wise maneuver.  To be sure Microsoft would consider it not recommended.)

Isn’t WinAte fun?  Oh, let’s call it WinAin’t.

(In all fairness, Win8 does seem to perform better than any previous version of Windows.  It’s just that you have to contend with that shitty interface.  Seriously, seven menus deep?)

Share

Gnome-Do and Unity, Harmoniously

Gnome-do is without a doubt the fastest application launcher I have used on any platform. Once I got into the -do groove I was hooked, utterly. I don’t want to go back.

Apple (either Launchpad or Spotlight), Windows (Metro Modern whatever), and Ubuntu (Unity Dash) all not only offer a slower experience, but each one takes you completely away from what you were doing and you thus lose continuity in your workflow making you wonder why you walked into the kitchen and so you walk back to the living room to see that you needed a fork and so you walk back into the kitchen and forget…

Gack!  Don’t do it!

By contrast gnome-do sneaks in almost unnoticed and let’s you get to the next step without hampering that tenacious continuity with an “oh, look!  squirrel!”.

Simple, small, and unobtrusive is great, but as if that were not enough it’s also exceptionally speedy.  Oh, and it learns from what you select (the stuff you use tends to come earlier and earlier as you type in subsequent searches).

The trouble is with the latest versions of Ubuntu you get Unity.  Unity uses the super key (Windows key or Command key or Apple key or…) to evoke the Dash (similar to how Windows uses the Windows key to evoke whatever they are calling that tile-oriented mess of an application launcher in Win8 now).  For whatever reason, that key binding supersedes any other attempts to use the super key in non-Unity key bindings (shortcuts).  (There is a bug report here for this particular behavior.)

Fortunately I found this fix.  (Which works only some times.  See notes in comments below.)

You’ll need to install the CCSM and (of course) gnome-do.  Enter these into your terminal (or find them in the Ubuntu Software Center):

sudo apt-get install compizconfig-settings-manager

sudo apt-get install gnome-do

Once these are installed open CCSM and navigate to the Ubuntu Unity Plugin (located under Desktop).  Do be careful in the CCSM; it’s powerful and you can really bug things up if you muck around without some due diligence.

For this fix we’ll just be changing one item and it’s a pretty safe one.  On the Launcher tab the first item is called “Key to show the Dash, Launcher and Help Overlay“.  Click the edit button (the one that looks like a pencil).  Put exactly this in that box:

<Control><Super>

Ok your way out of this and test it.  If you hit ctrl+windows you should see the Dash take over.  Great.  This change will allow other key bindings to make use of the super key.

Now open gnome-do (using the Dash if you’d like).  If you click on the small triangle in the upper-right of the gnome-do window you’ll see Preferences.  You can poke around in this preferences area with impunity, but for our purposes again we are just making one change.  On the Keyboard tab you are going to change the shortcut for Summon Do.

You are supposed to be able to double-click on the current shortcut (in this case likely just Disabled) and give your new shortcut.  I have had to quadruple-click in 13.04 and I don’t know why.  Regardless, change that shortcut to super+space.  Again, test this to ensure that when you hit super+space gnome-do is summoned.

Reboot.

Unfortunately there was a quirk: I would create the shortcut for super+space and it would revert to Disabled at every reboot.

If you find that the key binding for gnome-do is not persistent (and I found this to be the case on every 13.04 system I tested), there is a fix.  After persistence fails on reboot, return to the gnome-do preferences and set the shortcut for Summon Do to ctrl+space.  Reboot.  Now when you hit super+space (yes, super+space) it should work and it should remain persistent.

Enjoy your gnome-do.  I know I do.

Share

Get Information from Mac’s System Profiler

I had need recently to get both the serial numbers and the processor information from all of the Macs on our domain here at work.  I had zero interest in visiting every desk to do this so I did some kicking around and found a fine command line tool where I could what I needed with a couple simple lines of code.

The utility, called System Profiler, has a command line element which is evoked by the command system_profiler.  I’ll show you a couple of examples (which I used to get the serial numbers and processor information).

First, to get the serial number for a machine I ssh’d to that machine (ssh root@machine-name) and ran this:

system_profiler | grep “r (system)”

(You will need to replace the fancy quotes above with regular un-fancy quotes if you use this at your terminal.)

And to get the processor information I ran this equally simple line of code:

system_profiler | grep Proc

Feel free to check the output on your own Mac.

You can also just run system_profiler, but you get a lot of output from that.

system_profiler

If you have some inkling of what you seek you could try something using grep (as I did above).  Note that you can find the exact string in my greps above in their respective outputs.  Play around with grep; it’s pretty harmless on its own.

Hope it helps you in your adventures.

Share

Download the Proper 64 Bit Opera for Windows

As you probably have guessed, Opera is my preferred browser across all operating systems.  I know they have a 64 bit version for Windows (as they do for Mac and Linux), but for whatever reason that particular version is tricky to locate.

Normally you can just hit their site and you will be directed to download the correct version for your system.  Unfortunately the 32 bit version for Windows is what is presented.

If you would like to get the Windows 64 bit version (or any number of other different or older versions), try starting with this page.  Once on that page you can follow a selection tree to get to the version you are after.  For the Windows version you would first click Windows, then click the latest version number, and finally choose 64 bit from the “Architecture” drop-down menu and click the “Free Download for Windows” button.

That’s it.  You can thank me later.

Share

Java Applet Failure in Accellion Product

We run a product, not too dissimilar from Dropbox, for sharing large files across company lines.  Our product is made by Accellion and it works pretty well all things considered.

Recently we ran into troubles with the Large File Uploader.  This is a technology for uploading larger files (above 2 GB, I believe) into the system.  Small files were working fine but for the Large File Uploader the “Choose File/Folder” button was remaining grayed.  Though this behavior was consistent across platforms it was only happening on certain machines.

Playing around with different browsers gave me some clues.  Opera with plugins disabled and JavaScript turned off it would give the same experience as the other browsers (the needed button being grayed-out).  However, once I enabled JavaScript (for that site) and enabled plugins (using plugins on demand also failed silently) I finally saw there was a missing plugin.  (Other browsers were not indicating there was a missing plugin.)

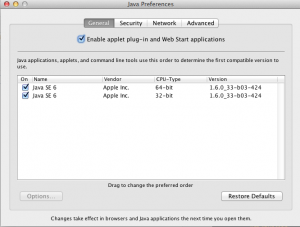
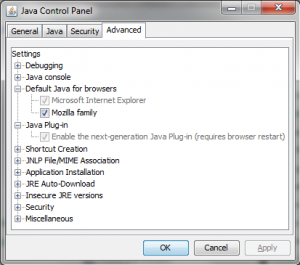
Turns out the plugin wasn’t technically missing.  You must also enable plugins in Java Preferences.  Here are both the Windows and Mac Java Preferences dialogs.

Java Preferences (Windows)
Java Preferences (Mac)

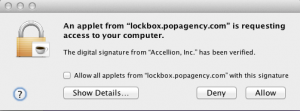
After fixing that, try visiting that page again and you (finally!) get something useful.

Security Dialog
Security Dialog

Tada!

Share