History
Back when Outlook used to require users to keep archived mail locally—you know, back when hard drives were small—there was a useful feature for automatically archiving mail along definable parameters (like age and size and so forth). Now that storage space is in many respects limitless Microsoft has caught up and allowed greater storage on the server-side for archived mail.
Here at Pop we, upon request, allow users access to their very own on-line archive. The advantage of an on-line archive over the old-style local archive are significant: you have access to the archive from anywhere you have access to your regular inbox. However, there is a price to be paid. For whatever reason, once the on-line archive has been activated for a user Outlook no longer displays any mention of the auto-archiving features and functionality. The menu items are not merely grayed-out; they are gone from the menus completely. It’s like double-think.
Why?
Anyway, I have written this page as a helpful guide for users looking to automate at least some aspects of the archiving process using their on-line archive. The sleek auto-archiving features are gone, so we’ll have to make-do with a clever deployment of rules.
These rules will run client-side (within Outlook) and thus can only be run while using Outlook. (The mail archived using the rules would subsequently be accessible from Outlook Web Access, but there is currently no way to run these rules from OWA.)
Let’s take a look at some options for creating rules.
What to do?
It is not currently possible to get the same functionality from a rule as was previously available through the Auto-Archive features, so we’ll try to get as close as currently possible.
Under the HOME tab in Outlook’s Ribbon you’ll find a Rules drop-down.
Choose “Manage Rules & Alerts…“. This will bring up a list of your current rules (if any).
If you have not already done so, please create a new rule to get started (using the “New Rule…” button near the upper-left).
(If you already created a rule for archiving and are just here to run it again, pull up that rule for editing and skip to The Next Section.)
Since there is no template for our purpose, we’ll just hit Next.
Under the area called “Step 1” locate the check box for “received in a specific date span” and check it. (Uncheck all others.)
Note that “Step 2” remains the same for configuring your rule. This will be important for subsequent runnings of this rule.
The next line should already read “move it to the specified folder” and then “and stop processing more rules“, so from here we can simply configure our rule for archiving into your On-Line Archive.
The Next Section
If you click on “in a specific date span” you will get a small dialog for choosing a date range.
Check “Before:” and select a date (presumably one month before today) before which you’d like to move messages into your archive.
Click OK.
Now, click on “specified” (within “move it to a specified folder“) and you will encounter a folder selection dialog.
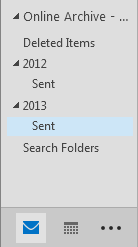
Scroll down and find your Online Archive. I recommend creating a folder for each year in your archive (2012, 2013, &c) and simply move all old message into the appropriate year. Either create a folder or select a folder within your On-Line Archive.
(At this point Outlook may try to sneak in a check box for “on this computer only”; you may and probably should uncheck that.)
(If you are planning on duplicating your folder hierarchy in your archive, you will want to select the specific folder you are archiving from your inbox. Below I will advocate for a flat hierarchy (no sub-folders) in your archive which has substantial advantages.)
Next > Next > Next > will get you to the last page of wizard dialog. Now the dialog changes a bit.
- Step 1 shows your name field for the rule (call it Archiving Rule or similar).
- Step 2 shows options and you will want to uncheck “Turn on this rule“.
- Step 3 shows the parameters you just configured for your rule.
Click Finish.
Now you should be back at your list of rules. Double-check that your newly created Archive Rule is unchecked.
Run, Rule, Run
Go ahead and click the “Run Rules Now…” button.
You are now confronted with a dialog for manually running rules.
Check only your Archive Rule.
Note that you can select the folder upon which to run this rule by browsing at “Run in Folder:“. Running your rule against your Inbox is usual. (Selecting “Include subfolders” streamlines the process of flattening your hierarchy into your single annual archive folder. I recommend you check “Include subfolers“.)
You may want to “Apply rules to:” “Read Messages“, but the default of “All Messages” will typically be appropriate.
Now it’s time. Run Now.
A Flat Hierarchy
Many of us use subfolders beneath our Inbox. Some of us even us deep paths of subfolders in complex and organized hierarchies. However, I recommend using a simple and as flat as possible hierarchy in your On-Line Archive.
There are some values gained from doing this which make the loss of organization insignificant.
Outlook didn’t used to have a very decent search algorithm, but that’s changed as Microsoft tries to compete with Google. And we benefit. The searching of the On-Line Archive is quick and efficient; however and for whatever reason, search in the archive cannot search through subfolders.
So, if you use a flat hierarchy you search through everything by searching in that folder. If you have a complex hierarchy within your archive you must search one folder at a time.

Keeping your folders clean like this above example will also keep your happy smile clean!