Category Archives: Shell Games & Scripts

Date and Time on the Windows Command Line

What a mess.  All you want to do is insert a timestamp into a file name so as to make it easily organizable.  That ought to be simple, right?

Wrong!

What a mess.  There are two real issues at the heart of this.  First, Windows is deathly afraid of nine characters:

\ / : * ? ” < > |

To Windows, those are the most frightening things imaginable.  Do you feel the fear?!  None of their file systems (from FAT16 to NTFS) can manage files using those characters.  Don’t get me wrong, some of those characters can be problematic in a file name.  Can be.  But this prohibition really gets in the way.  Think about how time is formatted literally everywhere.  And who doesn’t love the value of the question mark…

The second issue is that the content of the DATE variable is inexplicably the result of the region and not independent of the region.  So, if a user changes the date display according to where they are, if they change it from the default, the output of the DATE variable is different and must be parsed differently.  (The same problem exists with the TIME variable and the 24 hour clock.) . Again, unfathomable why anyone would use this as a starting point.

In short, I can’t offer a definitive line of code for giving a file name an up to the second timestamp.  I can only offer a line that may or may not need to be tweaked for a given user.

This is for the default date and time settings:

%date:~-4,4%%date:~-10,2%%date:~-7,2%_%time:~0,2%%time:~3,2%%time:~6,2%

This allows you to create a command like this:

move file.txt %date:~-4,4%%date:~-10,2%%date:~-7,2%_%time:~0,2%%time:~3,2%%time:~6,2%_file.txt

This slices up the DATE and TIME variables (using ~ and then some basic coordinates) to give a result (with an underscore between the date and the time).  If the user is employing a different date (or time) format you’ll have to play around with the coordinates to grab the correct chunk.  Best of luck.

Go get ’em, tigers!
Share

A while-read Loop

I found myself in need of a way to optionally run the same line of code before a script exited.  Well… need… it’s what I wanted.  Anyway.

After some trouble sorting out some syntax issues and some confusion about how to get a while loop to depend upon some user input, I came up with this code snippet which I will do just what I wanted.

##
# by JamesIsIn

variable=y
while [ "${variable}" = "y" ]
do

   ## What you want repeated goes here.##
   ## What you want repeated goes here.##

     read -e -p "Do you want to go again? [y/n]"
     echo $REPLY
     ## variable="${REPLY,,}" ## after bash v4 ##
     ## variable="$( echo "${REPLY}" | tr '[A-Z]' '[a-z]' )" ## for Mac and bash < v4 ##
     echo $variable
     if [[ "${variable}" = y ]]; then
          echo "Ok!"
     elif [[ "${variable}" = yes ]]; then
          echo "Ok!"
     else
          echo "Damn!"
          variable=n
     fi
done

##

As you can see, the line which takes the REPLY and pushes it into variable is repeated.  This is because there is a simpler way to make the reply lower-case starting with bash v4.  I included both lines in case anyone wants to use this on older versions of bash (including on Macs which still use an archaic version of bash).  Just uncomment the line for your system.

Enjoy.

Share

Delete Keychain Folder

We run the Casper Suite to control our Macs at work, and we are using folder re-direction for our conference room machines (for the users’ home directories).  Since all of these machines are Active Directory members and users do change their passwords (quite frequently per policy), we have issues when folks attempt to log into a conference room machine after they have changed their passwords.

The real trouble seems to be that Apple hasn’t quite readied the Mac OS for full enterprise AD integration.  Though the Macs are members and though a user is able to log in using network credentials, once those credentials are cached the OS doesn’t like to check with AD when the credentials offered by the user are not matched with those cached in the keychain.

I created a Self Service script which simply removes the entire keychain folder for the then logged-in user.  If there is a less heavy-handed solution to this matter I have not yet found it.  Here is that script for entertainment.

##
## Conference Room Keychain Fix
#!/bin/bash


## Delete user's Keychains folder (located in redirected home directory's Library folder)

username=$(stat -f %Su /dev/console)
rm -R /home/"$username"/Library/Keychains/


exit
##

I hope you find this useful and expedient.

Share

Fix for Firefox’s Profile Manager Error

There is a bug in Firefox (as near as I can tell) and it has been present for many versions (more than a dozen at least). It only effects users in a particular configuration on Macs, so it is not very likely to get any love any time soon. (I filed a bug report here ages ago.)

In short, Firefox is able to create it’s Profiles folder under /path/to/home/[username]/Library/Application Support/Firefox/ and it is able to create the associated profiles.ini file next to it.  However, Firefox is not able to add the information pointing the profiles.ini folder at the newly created profile folder.

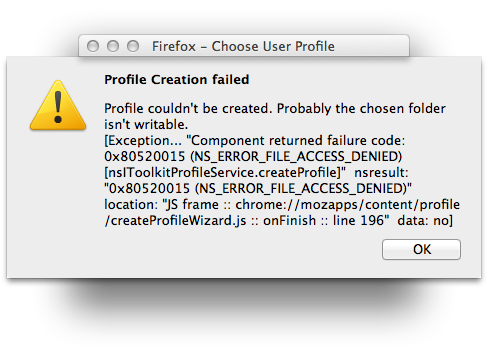
If you try to launch Firefox you will only get the Profile Manager and it will not be able to see any profiles, nor will it be able to create one.  Instead it throws an error:

Profile Manager Error

Anyway, perhaps one day Mozilla will fix it.  In the meantime I need to be able to fix this for users.  I know I can add a known-good profile and profiles.ini pair, so I figured I could just build my own profiles.ini file based on what I saw in the Profiles folder.  That worked so I just needed to create a way to use that information.

We use the Casper Suite to manage the Macs in our environment, so I was bent on doing something through Casper.  Additionally I wanted to user Casper’s Self Service application so I could just point a user to a single button to fix the problem.

Here is the script I added for users to evoke through Self Service.

## 
#! /usr/bin/env bash 
# Fix Firefox profile manager error on machines with re-directed home directories. 
# by JamesIsIn 
# Do something nice today. 
# https://github.com/jamesisin/slop-bucket/blob/master/popit/ConfRm_Replace_Firefox_profiles_ini.sh
## 


#Get current logged-in username. 
username=$( stat -f %Su /dev/console ) 


# Get first profile name in user's Library folder. 
profile="$( basename /home/"${username}"/Library/Application\ Support/Firefox/Profiles/* | head -1 )" 


# Empty and populate user's Firefox profiles file. 
printf "[General]\nStartWithLastProfile=1\n\n[Profile0]\nName=Default User\nIsRelative=1\n" 1>/home/"${username}"/Library/Application\ Support/Firefox/profiles.ini 
printf "Path=Profiles/""${profile}" 1>>/home/"${username}"/Library/Application\ Support/Firefox/profiles.ini 


exit 0 
## 

First I get the username of whomever happens to be logged in at the time Self Service is run on that machine and save that in a variable (called username).

Then I get the name of the first profile located in the user’s Firefox folder (under the user’s Library folder).  It doesn’t matter which one I use, I just arbitrarily chose the first one.  This way if there is only one I’ll be ok too.  I store that in a separate variable (called profile).

Finally I use those two variables to construct the appropriate profiles.ini file (using printf and standard output redirection).

Hope that helps you.

Share

Album Art Wallpaper Changer

If you’ve been following along you know all of my music is ripped or downloaded as FLAC and is living on an Ubuntu server here on my network. I do a fair job of scanning in the album art (there are stacks yet to be scanned because it takes too much time, but that is neither here nor there). I thought I’d like to make use of all these scanned covers as rotating background art on my hi-fi machine.

Really there are three problems. First, get a complete list of the cover images. Second, mount that location and list in a useful manner. And third, rotate (randomly) through those images as backgrounds.

First I tackled the mounting part. I already was mounting the music share (referred to as MusicShare in the script) so I simply added an administrative folder (referred to as zetc) in that share which included a folder to house the images. I could then place a shortcut in my Pictures folder on the client machine and make a call to that folder with whatever I used to rotate the images.

Next I wrote the necessary script, but I want to save that for the end so let’s talk about the application for changing the wallpapers now. I selected Wallch and it seems to have all the options I need and seems to work well enough. (I have it running on two machines currently and I have not seen any issues worth reporting.)

Wallch is in the standard repositories so you can locate it in the Ubuntu Software Center or install it using the Terminal (with sudo apt-get install wallch). The only unusual thing I did was add a custom time interval in the Preferences dialog as I wanted a 15 second interval (the included intervals went from 10 seconds to thirty). Set it to randomly select images and called that good.

Let’s look at this script briefly as that’s really the meat of this matter. There are issues with using symbolic links in smb shares (if I serve symbolic links I lose the use of non-Windows standard characters) so I created a folder (as mentioned above) to house the hard links to the found image files.

I didn’t care to sort out proper names for them as I won’t likely ever look in the folder or care about what any particular file is called, so the image links are all named incrementally without regard for album, artist, or location.

Finally, I didn’t want to concern myself with what may or may not be located in my links folder when I run the script again (to create a more current set of links), so I remove all files located in the links folder before filling it up again with the new image links.

Here is my script. I hope this helps you with your music art needs.

##
#!/bin/bash
# by JamesIsIn from JamesIsIn.com
# Do something nice today.

directory="/media/MusicDrive/MusicShare/"
zedfile="/media/MusicDrive/MusicShare/zetc/CoverSlideshow/ZedList"
zedfolder="/media/MusicDrive/MusicShare/zetc/CoverSlideshow/SymLinks/"

find "$directory" -type f -name [Cc]over.[Jj][Pp]*[Gg] -o -name [Cc]over.[Pp][Nn][Gg] -o -name [Cc]over.[Bb][Mm][Pp] -o -name [Cc]over.[Tt][Ii][Ff] > "$zedfile"

declare -a zedfind
let i=0
while read zedline; do
zedfind[$i]="$zedline"
((i++))
done < "$zedfile"

echo "I have found" ${#zedfind[@]} "cover images."
echo
read -p "Press <ENTER> to coninue. "
echo
echo

rm "$zedfolder"/*

for (( ii=0 ; ii < ${#zedfind[@]} ; ii++ )) ; do
originalfile=$( basename "${zedfind[ii]}" )
echo "Creating link:" $ii-"$originalfile"
ln "${zedfind[ii]}" "$zedfolder"$ii-"$originalfile"
done

unset

exit

##
Share

Two-Finger Scrolling Unavailable—Not

So I’m using a different laptop.  It has a touchpad for mousing around, and on the touchpad are arrows indicating you are able to use edge scrolling.  This laptop is new enough it presumably has two-finger touch sensitivity, yet for whatever reason Unity’s System Preferences showed “Two finger scrolling” as greyed.

I prefer two-finger scrolling and thus I poked around the Webz to see what I could see.

I found this question asked and answered which had a solution to enable two-finger scrolling.  Essentially the solution (work-around really) is a collection of three commands which enable two-finger scrolling (why it is greyed is another matter for another time).

I tested it and it worked on my machine (a Lenovo w500) as well.  Great.

As advised in the article one could add those three lines as part of one’s start-up scripts (.bashrc in most cases), but I was feeling differently.  First I consolidated those three lines into one line using double-ampersands.  Then I created an alias called touchpad which contained those three-now-one lines of code.

Confusedly, this work-around only remained effective until the machine went to sleep.  I would understand any logout, but you’ll see from the code that this effects X and X must relaunch after sleep (or at least changes state enough to reset this).

Checking the man page for alias (which I had to find on-line as my bash in Ubuntu 14.04 doesn’t have it) I found that I could make an alias persist (or at least make it get recreated) by adding it to my .bash_aliases file in my home directory.

Now it works great.  I have added that alias to each user account I use on this laptop so it is easy to call.  Perhaps one day I’ll add the work-around elsewhere so I won’t have to instantiate it, but for now I have this.

Below you will see the code I used.  I hope this helps you today.

##
#!/bin/bash
# by JamesIsIn from JamesIsIn.com
# Do something nice today.

# Here is my alias. The code between the single quotes is what you would need if your aim was merely to test-fix your touchpad.

alias touchpad='xinput --set-prop --type=int --format=32 "SynPS/2 Synaptics TouchPad" "Synaptics Two-Finger Pressure" 4 && xinput --set-prop --type=int --format=32 "SynPS/2 Synaptics TouchPad" "Synaptics Two-Finger Width" 8 && xinput --set-prop --type=int --format=8 "SynPS/2 Synaptics TouchPad" "Synaptics Two-Finger Scrolling" 1 0'

# Here is my .bash_aliases file.

cat .bash_aliases
# command to enable two-finger scrolling

alias touchpad='xinput --set-prop --type=int --format=32 "SynPS/2 Synaptics TouchPad" "Synaptics Two-Finger Pressure" 4 && xinput --set-prop --type=int --format=32 "SynPS/2 Synaptics TouchPad" "Synaptics Two-Finger Width" 8 && xinput --set-prop --type=int --format=8 "SynPS/2 Synaptics TouchPad" "Synaptics Two-Finger Scrolling" 1 0'

##
Share

Get Information from Mac’s System Profiler

I had need recently to get both the serial numbers and the processor information from all of the Macs on our domain here at work.  I had zero interest in visiting every desk to do this so I did some kicking around and found a fine command line tool where I could what I needed with a couple simple lines of code.

The utility, called System Profiler, has a command line element which is evoked by the command system_profiler.  I’ll show you a couple of examples (which I used to get the serial numbers and processor information).

First, to get the serial number for a machine I ssh’d to that machine (ssh root@machine-name) and ran this:

system_profiler | grep “r (system)”

(You will need to replace the fancy quotes above with regular un-fancy quotes if you use this at your terminal.)

And to get the processor information I ran this equally simple line of code:

system_profiler | grep Proc

Feel free to check the output on your own Mac.

You can also just run system_profiler, but you get a lot of output from that.

system_profiler

If you have some inkling of what you seek you could try something using grep (as I did above).  Note that you can find the exact string in my greps above in their respective outputs.  Play around with grep; it’s pretty harmless on its own.

Hope it helps you in your adventures.

Share

Make Minute Adjustments in Your Mac’s ScreenSaver Time

Sometimes you want more granularity than a drop-down menu supplies.  I found myself in this situation with start times for the screen saver on my Mac at work.

I use the initiation of ScreenSaver as a means to lock my machine (since Apple still ignores this vital business-environment feature).  If I’m not actively using that machine I want it to lock as soon as possible.  I also found that the controls in the GUI (the aforementioned drop-down menu) were too limiting.

After some hunting I found the controls necessary.

First, take a look at your current evocation time:

defaults -currentHost read com.apple.screensaver | grep idle

Mine is currently set to 120 (or two minutes).  I understand that anything below 60 will default to 60 so that seems to be the bottom limit.  Here is what you need to do to change your idleTime variable:

defaults -currentHost write com.apple.screensaver idleTime 180

As you can see I specified 180 seconds.  Feel free to test out different times as would be appropriate to your situation.  (Zero (0) means never.)

If you are seeking a command to initiate ScreenSaver directly (perhaps for scripting purposes) this works:

open ‘/System/Library/Frameworks/ScreenSaver.framework/Resources/ScreenSaverEngine.app’

Thanks to this thread for most of this information.

Have fun with that.

Share

How to Middle-Click (Properly) in the Mac BASh

I have been using a three-button scroll mouse ever since I started using Linux systems back in 1999. Don’t get me wrong, my previous Windows systems did technically have three-button scroll mice, but I wasn’t really using that third button. However, in BASh and in Linux systems in general you can perform the entire copy and paste cycle by merely highlighting some text and then middle-clicking where you want that text to go. Comparing this to the right-click ——> click Copy then right-click ——> click Paste, this is a saving of three clicks. Over the course of the day that’s a big savings.

Now, Mac runs BASh as its shell. It’s mostly there, only hobbled slightly. This middle-click ought to work except the Mac OS hijacks the middle-click of the mouse to jump to the Dashboard. To me this is useless. In part because I don’t really see much value in the Dashboard, but also in part because you can at any time pull up the Dashboard using the f12 key (fn + f12) or even put an icon in your Dock.

If you, like me, would rather have your middle-click in your shell there is a somewhat unobvious way to get there. (I’m running Mt Lion so your exact method may vary slightly.)

In System Preferences select Mission Control (about the middle of the top row called Personal). In Mission Control’s panel look near the bottom for “Show Dashboard:” and see the drop-down menu which presumably reads “Middle Mouse Button”. Change that to read “—”.

Once that is done you will be able to highlight some text in a terminal and middle-click to paste that text at your cursor position. Unfortunately this won’t make it work across applications (which it does in Ubuntu for instance), but it will help some.

We do what we are able.

Share

For net use, Persistence Is Persistent

We’ve been seeing a certain issue arise for random users in the company where I’m doing support currently. It would run something like this. Someone would leave to work from home or on a business trip, they would restart their laptop, and they would lose all of their mapped drives.

Some of the time things of this sort just happen.  It is Windows after all.  Do the same thing twice and get two different results.  That’s not shocking.  But it was forming a pattern.  It was, shall we say, spreading.

I decided it wasn’t an issue each of these machines was having but rather something more systemic.  I asked to look at the login script responsible for mapping drives.  The original script looked something like this:

net time \\[our-dc] /set /yes

net use M: /delete:yes
net use P: /delete:yes
net use S: /delete:yes
net use T: /delete:yes
net use V: /delete:yes

net use M: \\[a-server]\[some-share]
net use P: \\[another-server]\[a-different-share]
net use S: \\[we-have-many-servers]\[and-lots-of-shares]

(We actually have several similar scripts depending on the role of the user, but they were all similar enough to this one. Also, don’t worry about net time which merely calls out a time server. There was a syntax problem there was well, but I corrected it and the syntax you see above is now correct. And, damn it, you are smart enough by now to recognize that the stuff in the [brackets] is for substituting.)

I was suspicious because I typically use the persistent argument and this script was thus lacking. So I did a little research into the matter. It turns out that the persistence flag is itself persistent. This means that if it is set to yes it is yes until something else changes it. As such a script as you see above can fail if something (anything) happens to alter the persistence on a system to no. Once that system is then rebooted, all drive mappings (since they are still set to persistence=no) will vanish silently leaving the user wondering what happened (and calling into technical support to have it corrected).

That’s easy enough to fix. Include persistence.

As you might notice from the script above there are mapped drives being called out for deletion which are not being mapped. I wanted to also capture that in my replacement script. This is what I wrote:

net time \\[our-dc] /set /yes

net use * /delete:yes

net use /persistent:yes
net use M: \\[a-server]\[some-share]
net use P: \\[another-server]\[a-different-share]
net use S: \\[we-have-many-servers]\[and-lots-of-shares]
net use /persistent:no

This version deletes any mapped drives (using the * wildcard). Then it sets persistent to yes and maps three drives. Finally it reverts persistence to no so that any other drives mapped by the system will fall off at reboot (unless they are specifically set to yes). This really covers all the bases and ensures that drive mapping is kept very clean. More importantly it ensures that these mapped drives will always remain persistent regardless of reboots or user locations.

My boss didn’t like the idea that the script would delete all mapped drives and he didn’t like the idea of leaving persistence set to no (in case users wanted to map their own drives persistently). So I altered the script again to satisfy those requirements:

net time \\[our-dc] /set /yes

net use M: /delete:yes
net use P: /delete:yes
net use S: /delete:yes

net use /persistent:yes
net use M: \\[a-server]\[some-share]
net use P: \\[another-server]\[a-different-share]
net use S: \\[we-have-many-servers]\[and-lots-of-shares]

Now you should have enough to write some very fine, proper, and best-practice login scripts. Conversely you could write some notoriously bad scripts which plague users with bizarre behaviors and which flood your help desk with strange calls. Either way, have fun with that.

Share