Why this is even an issue is a little beyond me. It must come up often enough to get others annoyed by it. You have some piece of software that is crashing your system sufficiently that you are unable to remove it using a regular boot. So, you boot into Safe Mode. Only problem is, the installer service is disabled during Safe Mode.
Fuckety-fuck.
Well, let’s hack the registry a bit and sort that shit.
(Don’t be scared, but do proceed with caution and at your own risk.)
So log into your Windows 10 (or whichever, this ought to work even as far back as, ugh, XP) in Safe Mode (f8 is often useful to get there). Once you get in you can open the Registry Editor from a command prompt. Holding down the Windows key and pressing R (Win-R) will open the run dialog; then just type regedit and hit Enter.
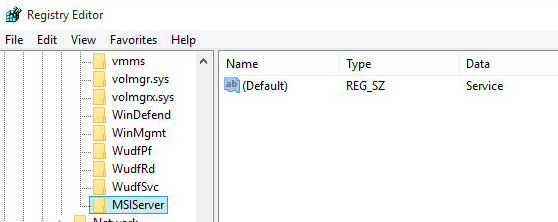
Once in the Registry Editor navigate to HKEY_LOCAL_MACHINE—> SYSTEM—> CurrentControlSet—> Control—> SafeBoot—> Minimal and right-click on Minimal. From the local menu which pops up, you’ll want to choose New —> Key. Name this new key MSIService.
(I have seen one report where the name MSIService did not work and the user used MSIServer instead. Try MSIService first and go from there.)
Within the new key, MSIService, right-click on the item called Default and choose Modify from the local menu which pops up; then in the Edit String dialog set “Value data:” to Service. Click the OK button.
regedit MSIServer
Ok, that gives the system what it needs to be able to run the Windows Installer service during Safe Mode.
(Note: if you are running Safe Mode with networking, you want will to do this same work also under HKEY_LOCAL_MACHINE —> SYSTEM —> CurrentControlSet —> Control —> SafeBoot —> Network, but I haven’t test that.)
Now let’s start that service so you can run your uninstaller (or installer for that matter).
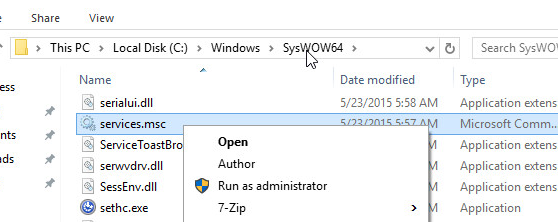
In an Explorer (file browser) window, navigate to This PC (or Computer or My Computer) —> Local Disk (your disk, probably C:) —> Windows —> SysWOW64 (earlier systems it may be in System32) —> services.msc; then right-click on services.msc and choose “Run as administrator” from the local menu which pops up.
Lauch services.msc as an admin
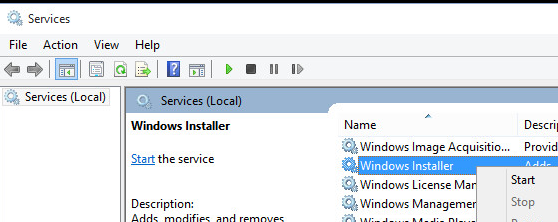
Now locate the Windows Installer service in Services, right-click on that, and choose Start from the local menu which pops up.
We run Sophos on all of our machines at work. I recently built a Windows 10 machine for one of our developers. He ran into a problem, however, when he tried to debug the application he was writing.
Sophos was falsely blocking his application with the following error message:
File “C:\Users\[username]\Documents\Visual Studio 2015\Projects\KillerFuckingApp\KillerFuckingApp\obj\x86\Debug\intermediatexaml\KillerFuckingApp.exe” belongs to virus/spyware ‘Mal/DotNet-C’.
Ostensibly a false positive I went to discuss the matter. It didn’t seem likely that his code shared any code with the known exploit so for shits and giggles I asked him to rename the application anything else to see if Sophos was merely objecting to the name.
Sure enough, once he removed “fucking” from the title, Sophos let things be.
At least Visual Studio wasn’t censoring our fucking developer.
I feel like you used to be able to install AD (Active Directory) through the “Turn Windows features on or off” dialog. Apparently you must now first download the Remote Server Administration Tools (or maybe it was always that way and I just don’t do it often enough to remember).
Regardless, if you behave like a normal administrator it will give you headaches and will fail. So I’ll give you the little advice necessary to make this installation go quickly and smoothly.
First go here and download the Remote Server Administration Tools. I am running Win7 64 bit so I downloaded the 64 bit version. If you are not sure, download them both and one of them will tell you it’s not compatible.
Ok, unfortunately you can’t just run the installer. The simplest way to ensure it actually installs (no failure allowed) is to launch it from a command line being run as an administrator. To do this open the Start menu and type cmd. When you see cmd.exe, right-click on it and choose “Run as administrator”.
Now you are running the command line with elevated privileges. Just launch the installer from the command line. You can do this by merely entering the path and file name and hitting Enter.
I always downoad items to the desktop (since they are easy to locate and they exist as a reminder to delete them when done). If I were signed into the built-in administrator account that path and file would look like this:
Click through the installation dialog and you will see the Remote Server Administration Tools appearing in your “Turn Windows features on or off” dialog. I check the following items (checking a parent does not check the children).
You would think this would be a simple operation. Migrating my bash history for Cygwin meant moving one file. But you’d be wrong. This migration means moving two registry hives, one file, and the contents of one very difficult to locate hidden folder. Well, at least it can be done.
I began with the RDP client already pinned to my Task Bar. Your results may vary if you have not done so. Let’s get started.
First open the registry editor (just type regedit in the Run dialog or in the search box for the Start menu). Once there navigate to
HKEY_CURRENT_USER —> Software —> Microsoft —> Terminal Server Client
In this location you will find two hives called Default and Servers. Export each of those hives (right-click —> Export), move them to the new machine, and import them (right-click —> Merge).
Then you need your Default.rdp file (and any other .rdp files you may have saved if you’d like). This is a hidden file located in your My Documents folder. Migrate that file to your other machine (just copy it into the same location on the destination machine).
Finally locate this hidden folder. You will not be able to navigate to it in the usual manner, even if you have hidden files enabled for viewing. Just put this in your Explorer window:
Migrate the entire contents of that folder to your new machine and you will migrate all of your so-called Jump Lists. If you are already using your new machine and would rather not see certain Jump Lists overwritten, only copy in the unique files. (I don’t know how to determine which file is which list at this time.)
Now you have all four of those items migrated (two registry hives, one file, and the contents you selected from one folder) just go ahead and restart your machine. Now you should be all good to go.
I have previously mentioned Virtual Dimension. It’s a great way to add multiple desktops to Windows (which Linux and even Mac support natively by now). Unfortunately, it looks like VD hasn’t been updated since 2005. (You can see my previous mention of VD here.)
There are a number of other potential candidates worth testing. There is VirtuaWin (this is the one I switched to when VD started failing me).
There is this Google Code project called Pager extension. (I haven’t tested this one.)
Here are a couple othersto round things out. One for XP and Vista and a more general one. (I have tested neither of these.)
As you can see I haven’t really kept up with these applications. That’s because I almost never have to use a Windows machine, and I certainly don’t use one as a main machine any more.
Feel free to post your opinions about these (or any other) desktop virtualization applications in the comments.
I was asked to sort out why a Lenovo ThinkPad X1 Carbon was not allowing a user to log in using his domain credentials. It was throwing an error claiming that the AD server was not available.
This is somewhat normal as the first time a user logs into our domain they are often required to connect via wire. Let’s ignore why that is the case and just accept it for now. The problem is, however, the Carbon lacks an Ethernet port.
Ah, but we have plenty of those Apple USB –> Ethernet adapters. I’ll just attach one of those.
That was fine. It even showed correctly identified in the Device Manager. The driver install failed silently and the device was accompanied by the usual yellow triangle of shame. So I right-clicked on the device and asked it to install the driver. It failed with a useless error message which I haven’t bothered to record into my memory.
Turns out you can’t install this driver (which Windows either includes or retrieves from Microsoft—I didn’t load it on myself) because it is an “unsigned” driver. Do you see the problem here? Windows downloads a driver from Microsoft (or the OS comes with the driver in a CAB somewhere) but what it downloads it doesn’t trust. That’s like me not trusting what I have in my pocket: it looks very much like my house key but I just can’t be sure.
Anyway, who cares if they are bumblers. You just want to know how to solve the problem. I took the following steps from this site.
Either roll your mouse to the lower-right corner and click the Settings icon or hit Windows-I.
Click “Change PC Settings” (or similar) at the bottom of that Settings side-bar.
Under PC Settings click General.
Scroll to the bottom on the right-hand pane and click the “Restart now” button under “Advanced startup”. (This doesn’t reboot “now”. There are more steps.)
On the “Choose an option” menu which follows choose “Troubleshoot”.
On the “Troubleshoot” menu choose “Advanced options”.
On the “Advanced options” menu choose “Startup Settings”.
On the “Startup Settings” menu click the “Restart” button. (This will reboot your system.)
On this (totally different) “Startup Settings” menu choose 7 (literally type a 7).
This will reboot your system with “driver signature enforcement” disabled. This should allow you to install the driver (by right-clicking in the Device Manager).
Once you have done that you can merely reboot to re-enable that, er, feature. (The page linked above also includes instructions for disabling this permanently. I have not tested this, nor would I consider it a wise maneuver. To be sure Microsoft would consider it not recommended.)
Isn’t WinAte fun? Oh, let’s call it WinAin’t.
(In all fairness, Win8 does seem to perform better than any previous version of Windows. It’s just that you have to contend with that shitty interface. Seriously, seven menus deep?)
As you probably have guessed, Opera is my preferred browser across all operating systems. I know they have a 64 bit version for Windows (as they do for Mac and Linux), but for whatever reason that particular version is tricky to locate.
Normally you can just hit their site and you will be directed to download the correct version for your system. Unfortunately the 32 bit version for Windows is what is presented.
If you would like to get the Windows 64 bit version (or any number of other different or older versions), try starting with this page. Once on that page you can follow a selection tree to get to the version you are after. For the Windows version you would first click Windows, then click the latest version number, and finally choose 64 bit from the “Architecture” drop-down menu and click the “Free Download for Windows” button.
We run a product, not too dissimilar from Dropbox, for sharing large files across company lines. Our product is made by Accellion and it works pretty well all things considered.
Recently we ran into troubles with the Large File Uploader. This is a technology for uploading larger files (above 2 GB, I believe) into the system. Small files were working fine but for the Large File Uploader the “Choose File/Folder” button was remaining grayed. Though this behavior was consistent across platforms it was only happening on certain machines.
Playing around with different browsers gave me some clues. Opera with plugins disabled and JavaScript turned off it would give the same experience as the other browsers (the needed button being grayed-out). However, once I enabled JavaScript (for that site) and enabled plugins (using plugins on demand also failed silently) I finally saw there was a missing plugin. (Other browsers were not indicating there was a missing plugin.)
Turns out the plugin wasn’t technically missing. You must also enable plugins in Java Preferences. Here are both the Windows and Mac Java Preferences dialogs.
Java Preferences (Windows)Java Preferences (Mac)
After fixing that, try visiting that page again and you (finally!) get something useful.
Back when Outlook used to require users to keep archived mail locally—you know, back when hard drives were small—there was a useful feature for automatically archiving mail along definable parameters (like age and size and so forth). Now that storage space is in many respects limitless Microsoft has caught up and allowed greater storage on the server-side for archived mail.
Here at Pop we, upon request, allow users access to their very own on-line archive. The advantage of an on-line archive over the old-style local archive are significant: you have access to the archive from anywhere you have access to your regular inbox. However, there is a price to be paid. For whatever reason, once the on-line archive has been activated for a user Outlook no longer displays any mention of the auto-archiving features and functionality. The menu items are not merely grayed-out; they are gone from the menus completely. It’s like double-think.
Why?
Anyway, I have written this page as a helpful guide for users looking to automate at least some aspects of the archiving process using their on-line archive. The sleek auto-archiving features are gone, so we’ll have to make-do with a clever deployment of rules.
These rules will run client-side (within Outlook) and thus can only be run while using Outlook. (The mail archived using the rules would subsequently be accessible from Outlook Web Access, but there is currently no way to run these rules from OWA.)
Let’s take a look at some options for creating rules.
What to do?
It is not currently possible to get the same functionality from a rule as was previously available through the Auto-Archive features, so we’ll try to get as close as currently possible.
Under the HOME tab in Outlook’s Ribbon you’ll find a Rules drop-down.
Choose “Manage Rules & Alerts…“. This will bring up a list of your current rules (if any).
If you have not already done so, please create a new rule to get started (using the “New Rule…” button near the upper-left).
(If you already created a rule for archiving and are just here to run it again, pull up that rule for editing and skip to The Next Section.)
Since there is no template for our purpose, we’ll just hit Next.
Under the area called “Step 1” locate the check box for “received in a specific date span” and check it. (Uncheck all others.)
Note that “Step 2” remains the same for configuring your rule. This will be important for subsequent runnings of this rule.
The next line should already read “move it to the specified folder” and then “and stop processing more rules“, so from here we can simply configure our rule for archiving into your On-Line Archive.
The Next Section
If you click on “in a specific date span” you will get a small dialog for choosing a date range.
Check “Before:” and select a date (presumably one month before today) before which you’d like to move messages into your archive.
Click OK.
Now, click on “specified” (within “move it to a specified folder“) and you will encounter a folder selection dialog.
Scroll down and find your Online Archive. I recommend creating a folder for each year in your archive (2012, 2013, &c) and simply move all old message into the appropriate year. Either create a folder or select a folder within your On-Line Archive.
(At this point Outlook may try to sneak in a check box for “on this computer only”; you may and probably should uncheck that.)
(If you are planning on duplicating your folder hierarchy in your archive, you will want to select the specific folder you are archiving from your inbox. Below I will advocate for a flat hierarchy (no sub-folders) in your archive which has substantial advantages.)
Next > Next > Next > will get you to the last page of wizard dialog. Now the dialog changes a bit.
Step 1 shows your name field for the rule (call it Archiving Rule or similar).
Step 2 shows options and you will want to uncheck “Turn on this rule“.
Step 3 shows the parameters you just configured for your rule.
Click Finish.
Now you should be back at your list of rules. Double-check that your newly created Archive Rule is unchecked.
Run, Rule, Run
Go ahead and click the “Run Rules Now…” button.
You are now confronted with a dialog for manually running rules.
Check only your Archive Rule.
Note that you can select the folder upon which to run this rule by browsing at “Run in Folder:“. Running your rule against your Inbox is usual. (Selecting “Include subfolders” streamlines the process of flattening your hierarchy into your single annual archive folder. I recommend you check “Include subfolers“.)
You may want to “Apply rules to:” “Read Messages“, but the default of “All Messages” will typically be appropriate.
Now it’s time. Run Now.
A Flat Hierarchy
Many of us use subfolders beneath our Inbox. Some of us even us deep paths of subfolders in complex and organized hierarchies. However, I recommend using a simple and as flat as possible hierarchy in your On-Line Archive.
There are some values gained from doing this which make the loss of organization insignificant.
Outlook didn’t used to have a very decent search algorithm, but that’s changed as Microsoft tries to compete with Google. And we benefit. The searching of the On-Line Archive is quick and efficient; however and for whatever reason, search in the archive cannot search through subfolders.
So, if you use a flat hierarchy you search through everything by searching in that folder. If you have a complex hierarchy within your archive you must search one folder at a time.
Simple Nearly Flat Hierarchy
Keeping your folders clean like this above example will also keep your happy smile clean!
One of my users reported that when they created a private meeting in a conference room using Outlook, the meeting was private for all users invited but public in the calendar for that room. Obviously that’s not very private.
What was Exchange doing?
I poked around. I asked around. Everything seemed to point in the same direction: if you share the resource calendar you should expect a lack of privacy.
I did not find this to be a very satisfying response. I will admit that an unsatisfying response can still be valid, but I wanted to keep poking this one to see if I could get it to twitch.
My friend, NizeKing (yes, the graffiti artist turned IT professional), discovered a setting that might be useful.
Private... Not!
So, uncheck that and (like magic!) private meetings remain private even in the resource calendars.
")
")


